Solution Pattern: Build an extendable Multi-Channel Messaging Platform
See the Solution in Action
1. Demonstration
The Demo primarily showcases how the combination of key Red Hat technologies are strategically used to deliver a cloud-native, unified collaboration platform. The concept can easily be leveraged to various other scenarios, but in this case, the demo focusses on a customer support multi-channel service.
The sections below will help you walk through the essentials of installing and running the demo. Even though many technologies are at play, the demo is straightforward to showcase centring around the following bullet points:
-
Initiate a customer support session using Rocket.Chat
-
Simulate a collaborative conversation between the customer and multiple support members (teams).
-
Close a session and trigger the process to archive a transcript.
-
Play a conversation using the Globex Web portal channel.
-
Extend the platform by creating and plugging a new customer channel.
2. Recorded Video
Watch the recorded video of the solution pattern, and find below instructions on how to install the demo and run it.
3. Install the demonstration
3.1. Prerequisites
You will require:
-
An OpenShift Container Platform cluster running version 4.15 or above with cluster admin access.
-
Docker, Podman or Ansible installed and running.
To run the demo’s Ansible Playbook to deploy it you’ll need one of the above. If none of them is installed on your machine we suggest installing Docker using the most recent Docker version. See the Docker Engine installation documentation for further information. You’ll find more information below on how to use Podman or Ansible as alternatives to Docker.
3.2. Provision an OpenShift environment
-
Provision the following Red Hat Demo Platform (RHDP) item:
-
Solution Pattern - Build an extendable Multi-Channel Messaging Platform
-
The provisioning of the RHDP card above will just prepare for you a base environment (OCP). You still need to deploy the demo by running the installation process described below.
-
The provisioning process takes around 80-90 minutes to complete. You need to wait its completion before proceeding to the demo installation.
-
-
-
Alternatively, if you don’t have access to RHDP, ensure you have an OpenShift environment available.
You can obtain one by deploying the trial version available at Try Red Hat OpenShift.
3.3. Install the demo using Docker or Podman
|
For more installation tips and alternative options to Docker and Podman, look at the README file in the demo’s GitHub repository. |
Ensure your base OpenShift environment is ready and you have all the connection and credential details with you.
-
Clone this GitHub repository:
git clone https://github.com/brunoNetId/sp-multi-channel-messaging-platform.git -
Change to the
ansibledirectory (in the root project).cd sp-multi-channel-messaging-platform/ansible -
Configure the
KUBECONFIGfile to use (where kube details are set after login).export KUBECONFIG=./kube-demo -
Obtain and execute your login command from OpenShift's console, or use the
occommand line below to access your cluster.oc login --username="admin" --server=https://(...):6443 --insecure-skip-tls-verify=trueReplace the
--serverurl with your own cluster API endpoint. -
Run the Playbook with Docker/Podman
-
First, read the note below
If your system is SELinux enabled, you’ll need to label the project directory to allow docker/podman to access it. Run the command:
sudo chcon -Rt svirt_sandbox_file_t $PWDThe error you may get if SELinux blocks the process would be similar to:
ERROR! the playbook: ./ansible/install.yaml could not be found
-
Then, to run with Docker:
docker run -i -t --rm --entrypoint /usr/local/bin/ansible-playbook \ -v $PWD:/runner \ -v $PWD/kube-demo:/home/runner/.kube/config \ quay.io/agnosticd/ee-multicloud:v0.0.11 \ ./playbooks/install.yml -
Or, run with Podman:
podman run -i -t --rm --entrypoint /usr/local/bin/ansible-playbook \
-v $PWD:/runner \
-v $PWD/kube-demo:/home/runner/.kube/config \
quay.io/agnosticd/ee-multicloud:v0.0.11  \
./playbooks/install.yml
-
4. Walkthrough guide
The guide below will help you to familiarise with the main components in the demo, and how to operate it to demonstrate the characteristics of this Solution Pattern.
|
The solution and examples in this chapter utilize integrations based on Apache Camel K. While Camel K is still active within upstream Apache Camel, Red Hat has shifted its support to a cloud-native approach, focusing on Camel JBang and Kaoto as primary development tools. As a result, all Camel K instances in this Solution Pattern will transition to the Red Hat build of Apache Camel, aligning with Red Hat’s new strategic direction. |
4.1. Quick Topology Overview
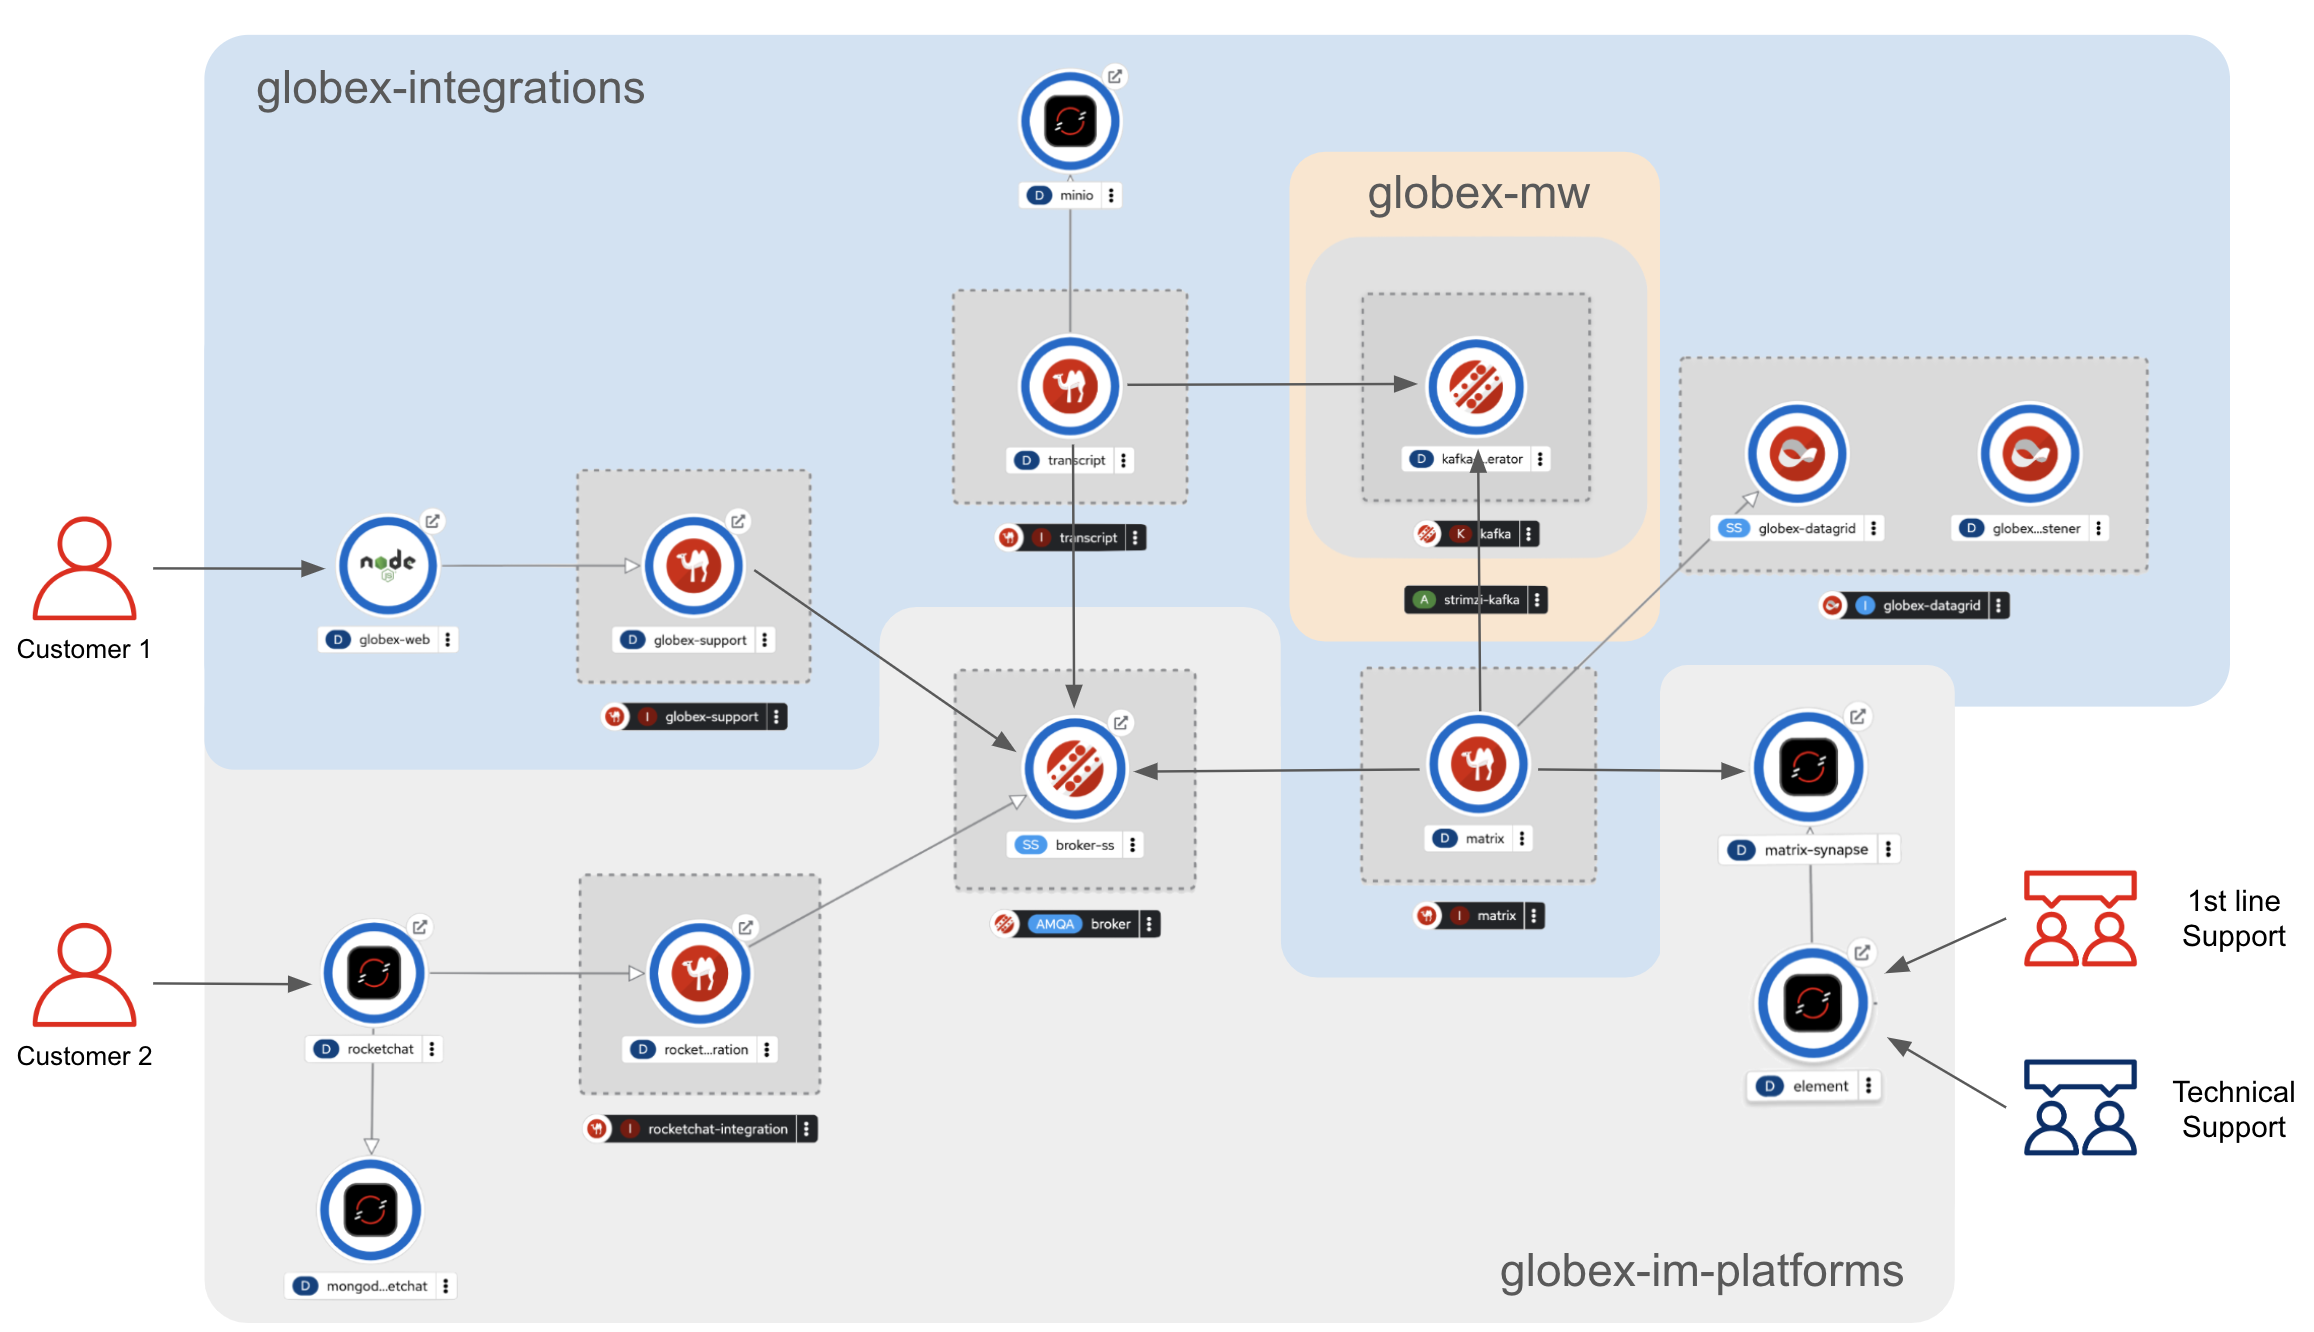
Because the automated installation process reuses deployment scripts from other lab resources, the platform components are split in three main namespaces:
-
globex-im-platforms: where the main instant messaging platforms are deployed, namely Rocket.Chat and Matrix. The Apache Camel integration for Rocket.Chat is also included here. -
globex-integrations: where all the main Apache Camel integrations are deployed. Also in this namespace you’ll find the Globex Web portal, an instance of Data Grid and S3 storage with Minio where conversation transcripts are stored. -
globex-mw: where the AMQ Streams (Kafka) instance used by the platform is deployed.
To have scattered components across different namespaces doesn’t help to intuitively understand the overall architecture.
The picture below shows a convenient composition of all three namespaces illustrating all the relationships and interactions involved in the solution.
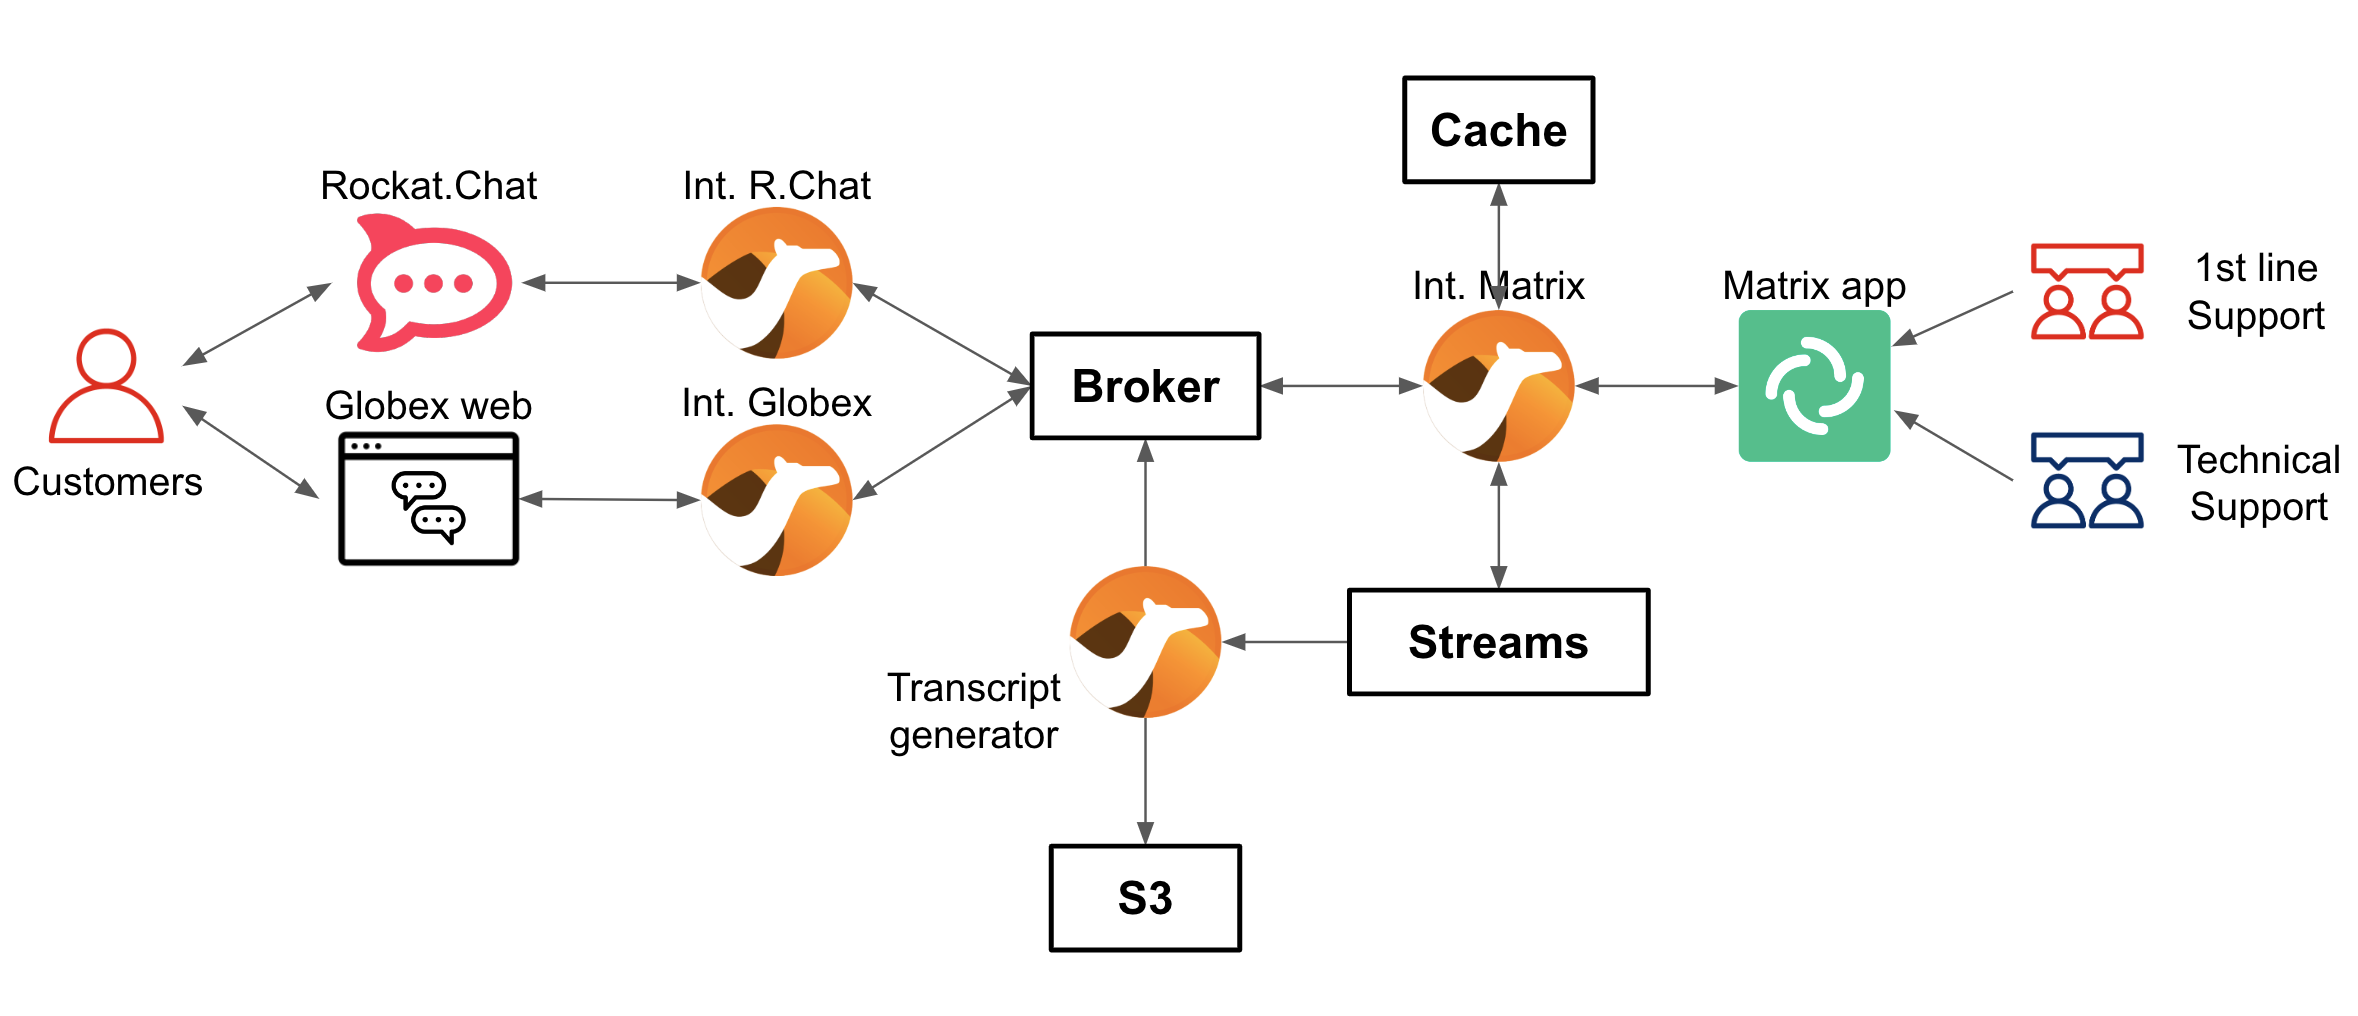
A more schematic view which maps closely to the composition view above is the following:
4.2. Initiate a support session
Open your OpenShift console with your given admin credentials and follow the instructions below:
-
Select from the left menu the Developer view:
-
Click the Administrator button and select Developer from the drop down.
-
-
Use the filter
globexin the search textbox. -
Find and select the project
globex-im-platforms -
Make sure you display the Topologoy view (left menu)
You should see a number of deployments in your screen. Find among them the Rocket.chat application and open it by clicking the route link as shown below:

The login window to the Rocket.chat application will show in a new tab.
Enter the following credentials:
-
username:
user1 -
Password:
openshift
| Rocket.chat here represents the customer’s entry point to access the support channel and have conversations with support agents. Agents are not Rochet.chat users, they use other collaboration tools, elsewhere, which are also plugged to the multi-channel platform. |
To start a support session, select the channel created for user1:
-
globex-support-user1

Then, pretend you are a customer by typing a message and sending it.
For example:
Hello, can I get help please?
Now, let’s switch to the agent’s system.
From OpenShift's Topology view, find the Element application.
| Element is the front facing interface application that connects to the Matrix server. |
To open Matrix, click Element's route link and then click Sign In as shown below:

The login window to Matrix will show in a new tab.
Enter the following credentials:
-
username:
user2 -
Password:
openshift
| Matrix here represents the collaboration tool agents use to assist customer enquiries. Matrix is integrated with the multi-channel platform and serves in the demo to show one of many tools from where different groups and partners could connect from. |
As soon as you login, on the left panel of the window, you’ll see an entry in your list of invites:
-
rocketchat-user1
The invite was generated the moment the customer sent the initial message to request assistance.
Accept the invitation by following the actions below illustrated:

Once accepted, you’ll see the message the customer sent (from Rocket.chat) in the main conversation area.
To follow with the simulated conversation, now pretend you are the support agent and type back a welcome message.
For example:
-
Agent (1st line):
Hi, what can I do for you today?
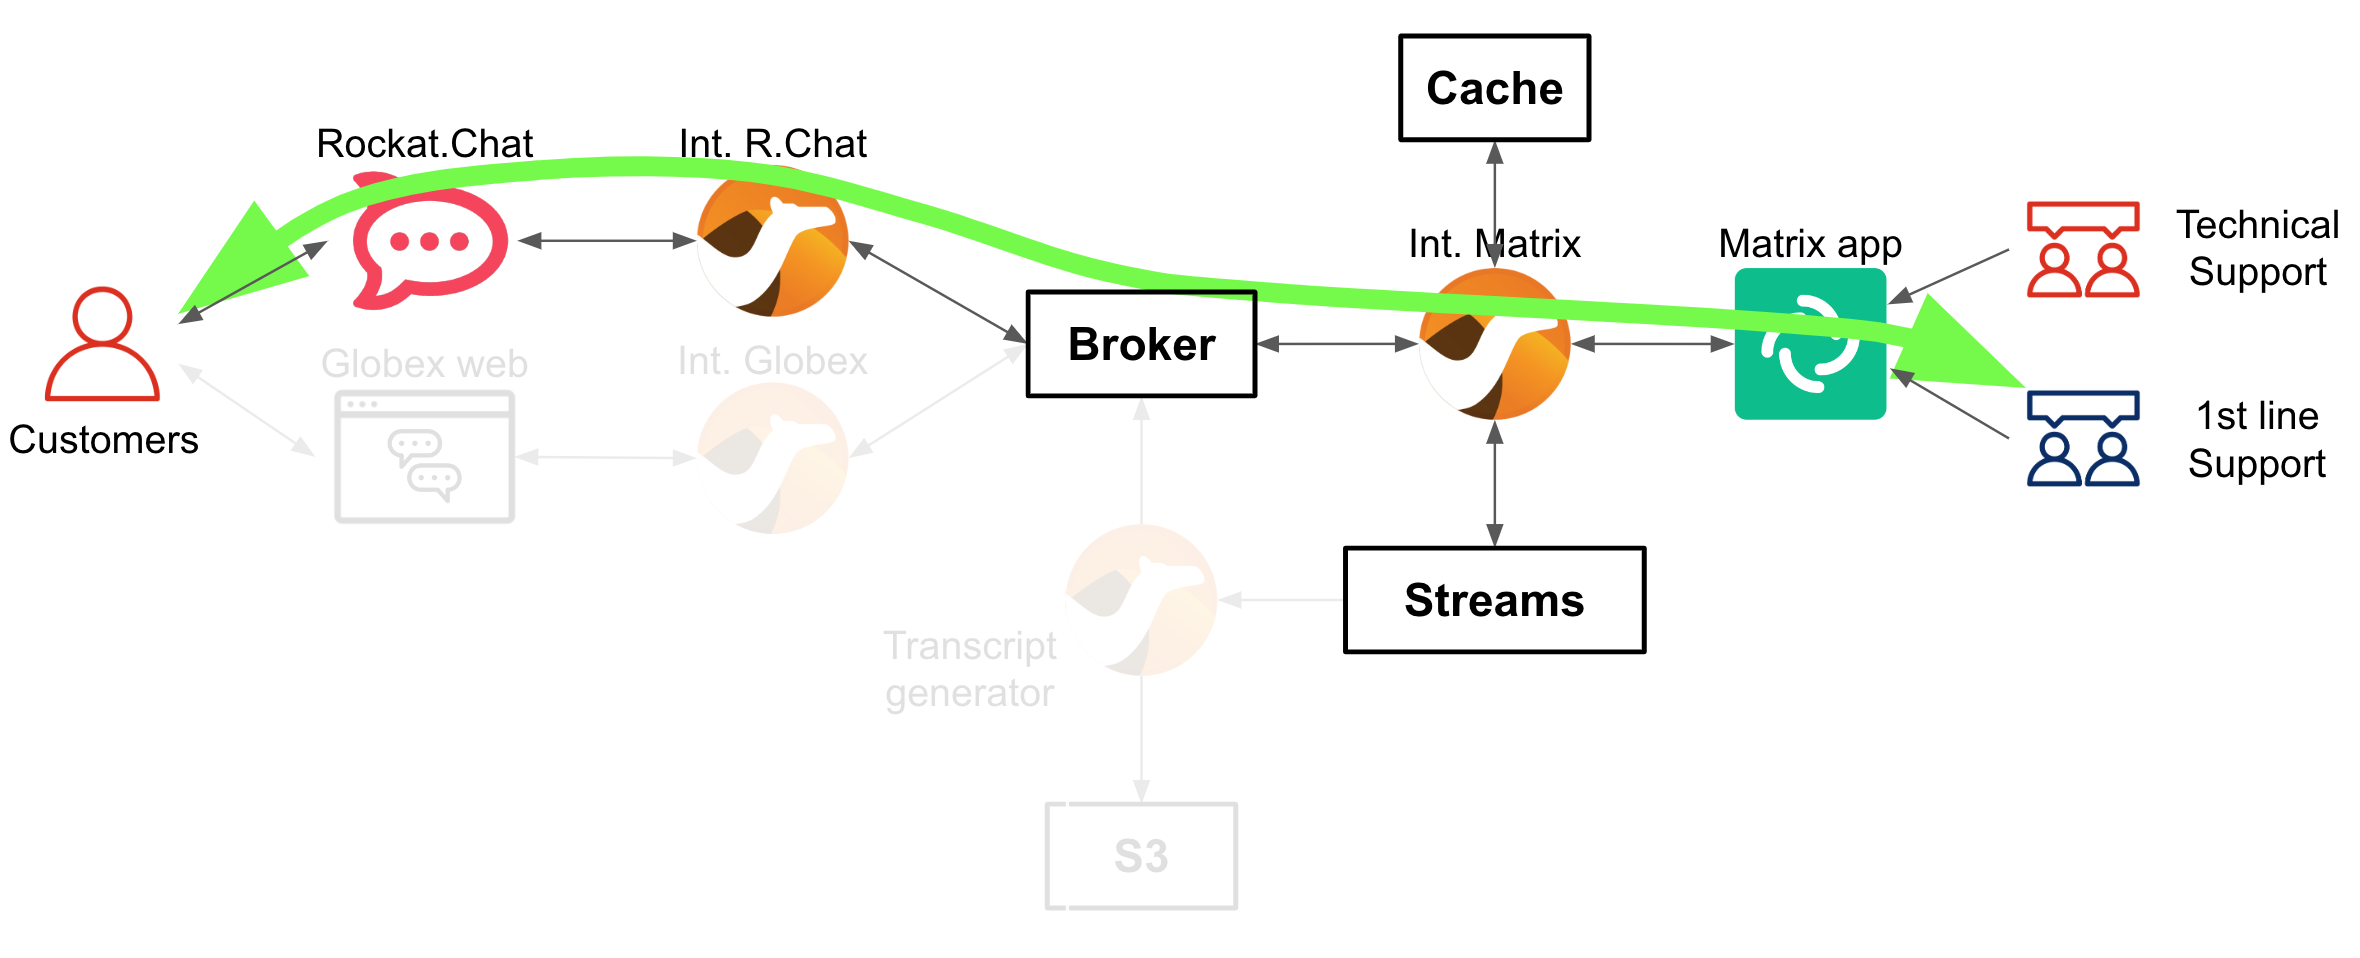
The diagram below illustrates the end-to-end traffic flow you’ve just enacted:
4.3. Simulate simultaneous Support teams
The Solution Pattern proposes a platform where multiple communication systems, internal and external, are integrated.
However, on the agent’s end, the demo only includes one system (Matrix). It’s not ideal, but it doesn’t stop us from simulating different groups participating in the same support session.
Earlier, the first team to respond was "1st line Support". Now we introduce a new agent, member of the "Technical Support" team.
| Since we just have Matrix, let’s just pretend the Technical Support team is connecting from a different IM system, not Matrix. From the demo’s perspective nothing changes. |
Let’s resume the conversation between the customer and the support teams.
Go back to Rocket.chat, put your customer’s hat on, and describe the problem to the agent, for example:
-
Customer:
When I browse the products, the wheel keeps spinning.
When the message is sent and the agent reads it in Matrix, he answers and explains the technical team will take over:
-
Agent (1st line):
Please wait a moment, a member of the technical team will assist.
Now, from the OpenShift Developer view, you will open a new window from where the new technical agent will communicate.
From OpenShift's Topology view, find the Element application.
Open your OpenShift console with your given admin credentials and follow the instructions below:
-
Make sure you display the Topologoy view (left menu)
-
Find and select the project
globex-integrations
From your Topology view, open Matrix by following the actions below described:
| We open Element in an Incognito window to avoid entering in conflict with your previous Matrix session. |
-
Click the Element deployment disc
-
Find and click the
Resourcestab -
Copy the Route URL
-
Open an incognito window and paste the URL address
-
Enter the Sign-In process in Element
You should end up viewing the Login prompt as shown below:

Make sure you use a different username to simulate the "Technical Support" agent, for example user3.
|
-
username:
user3 -
Password:
openshift
Again, you’ll find in the left panel an invite to the room where the customer is being attended:
-
rocketchat-user1
Accept the invitation by following the actions below illustrated:
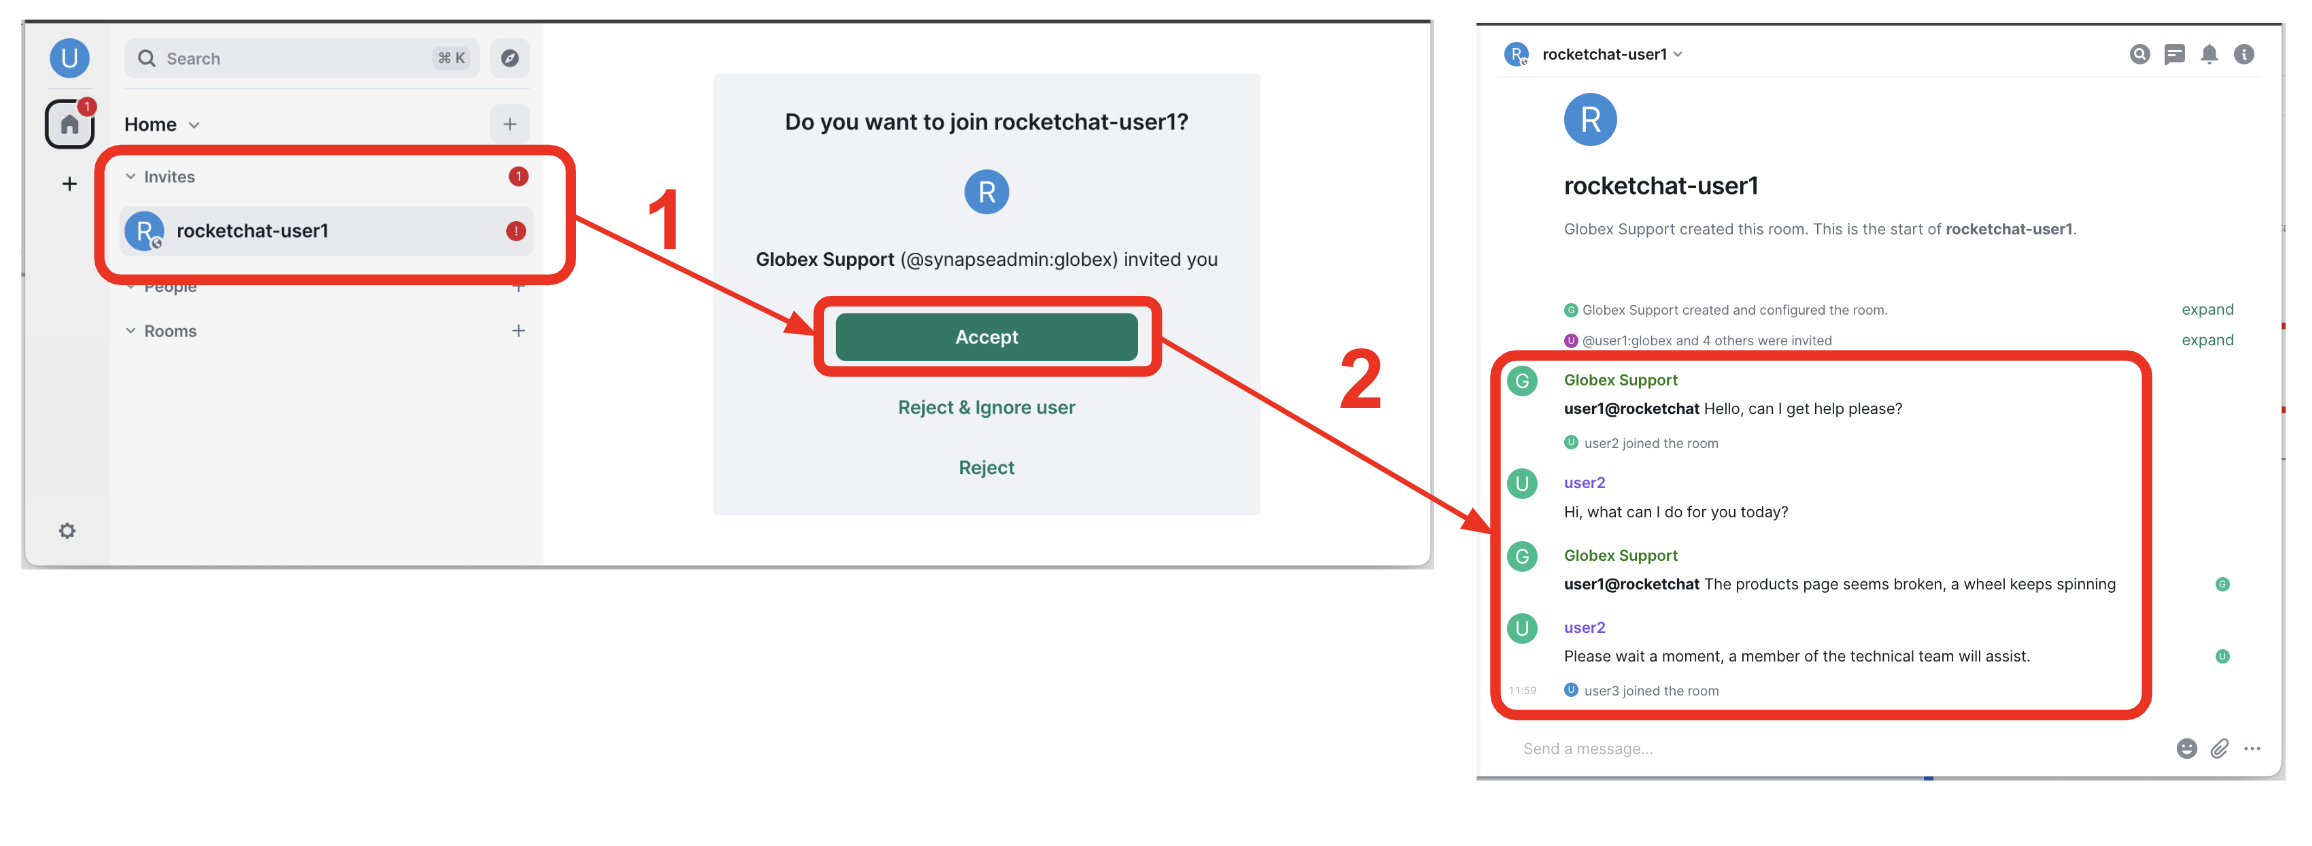
Once accepted, you’ll see the entire conversation history.
Now pretend you are the technical agent and respond to the customer.
For example:
-
Agent (technical team):
Hi, I’m from the technical team. We just completed an update, please try again.
When you send the response, it should pop up in Rocket.chat.
In the Rocket.chat channel you’ll see now responses from 2 different agents. The first was a "1st line Support" agent, and the second a "Technical Support" agent.
| As previously explained, in the demo, both agents are connecting from Matrix, but the Solution Pattern allows other IM platforms to plug in. |
Let’s assume the problem was resolved and the customer responds with:
-
Customer:
Thanks, I confirm I can now browse the products.
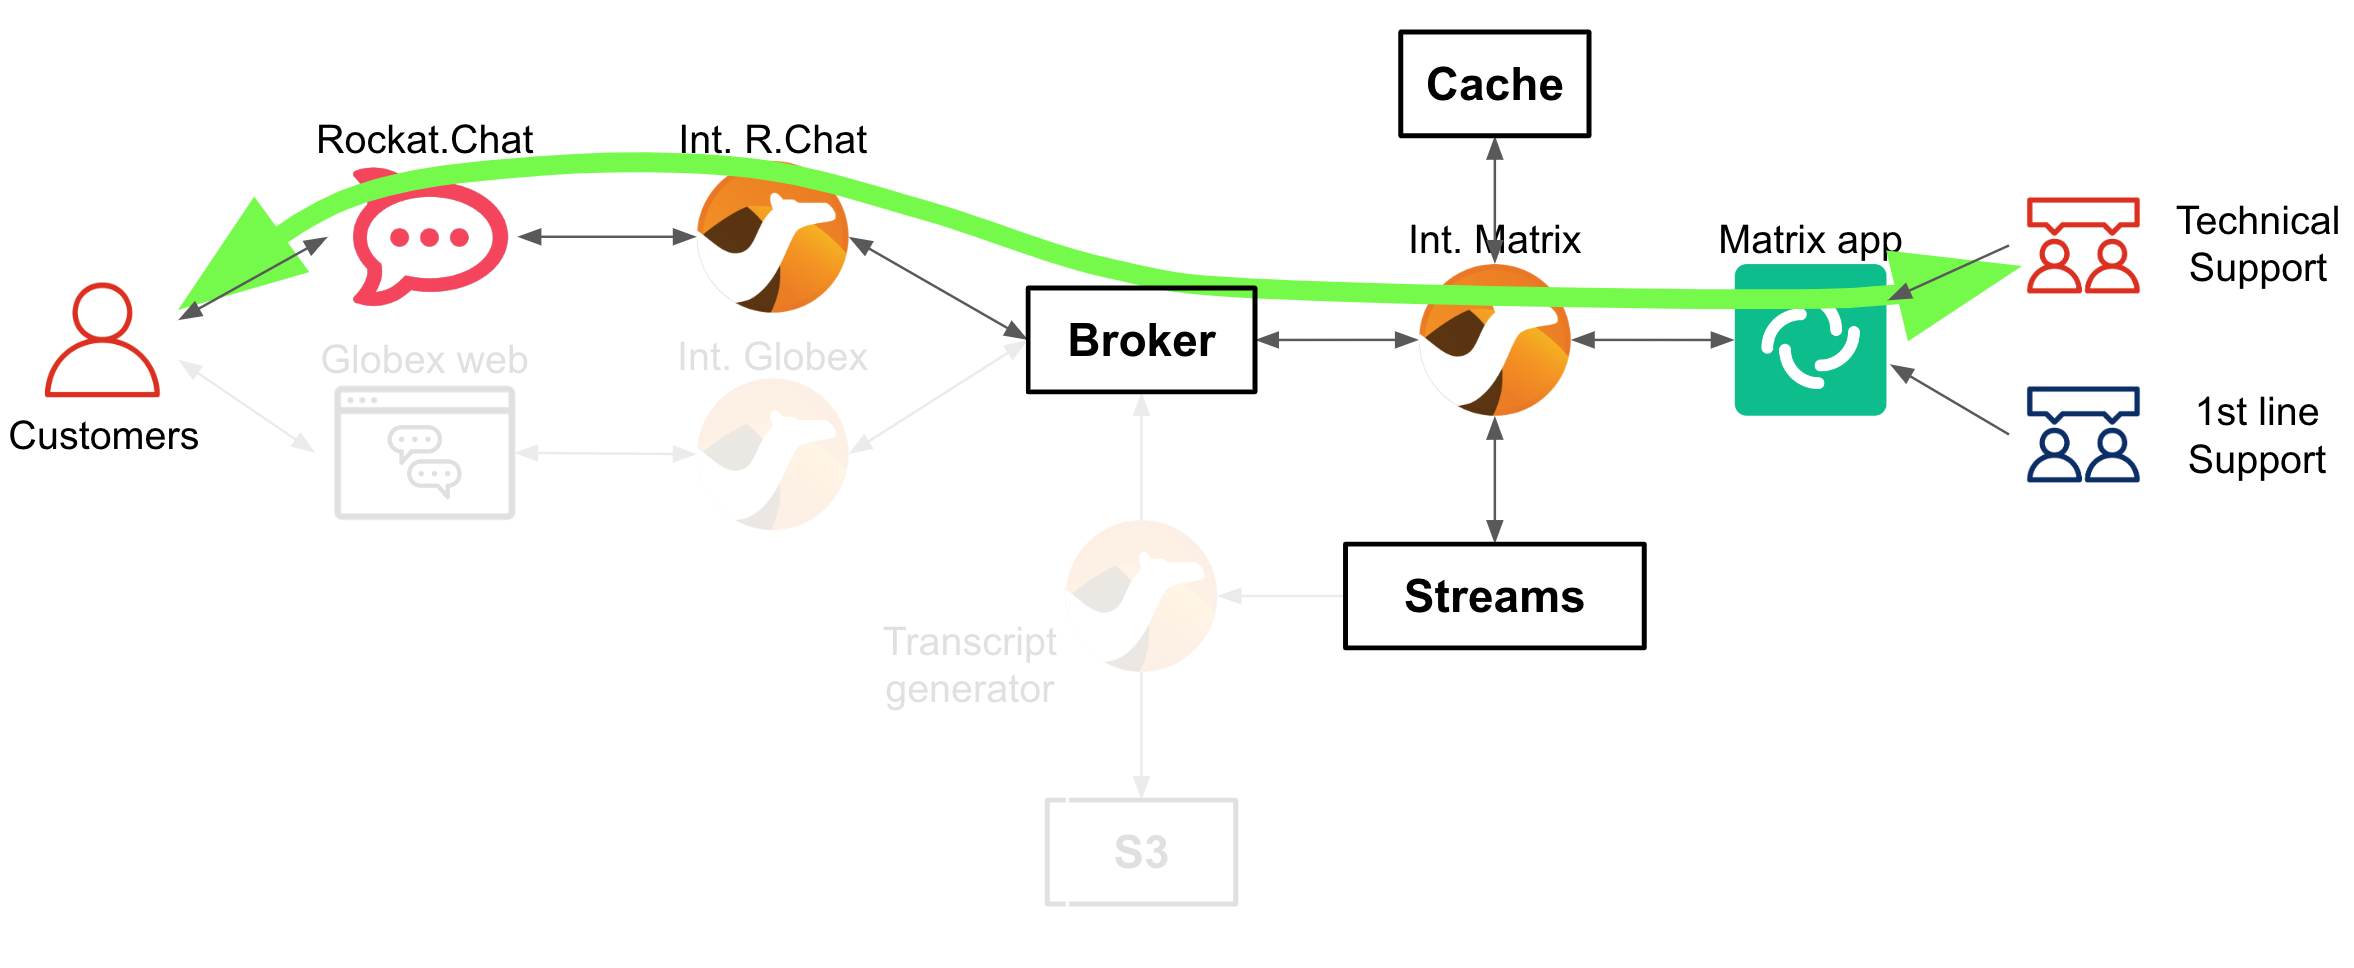
The diagram below illustrates the end-to-end traffic flow you’ve recreated involving the Technical Support team:
4.4. Close the session and archive the conversation
One of the features the Solution Pattern showcases is the ability to integrate pluggable services in the background.
To demonstrate the ability to plugin services, we’ve implemented an integration process that reacts when a customer support session ends. When a conversation is closed, the process listens to the signal and generates a transcript and is pushed to object storage (S3).
| The background context is that the organisation is obligated to meet certain security policies and Government regulations. All communications need to be kept for a certain period to comply with the established data retention policies. |
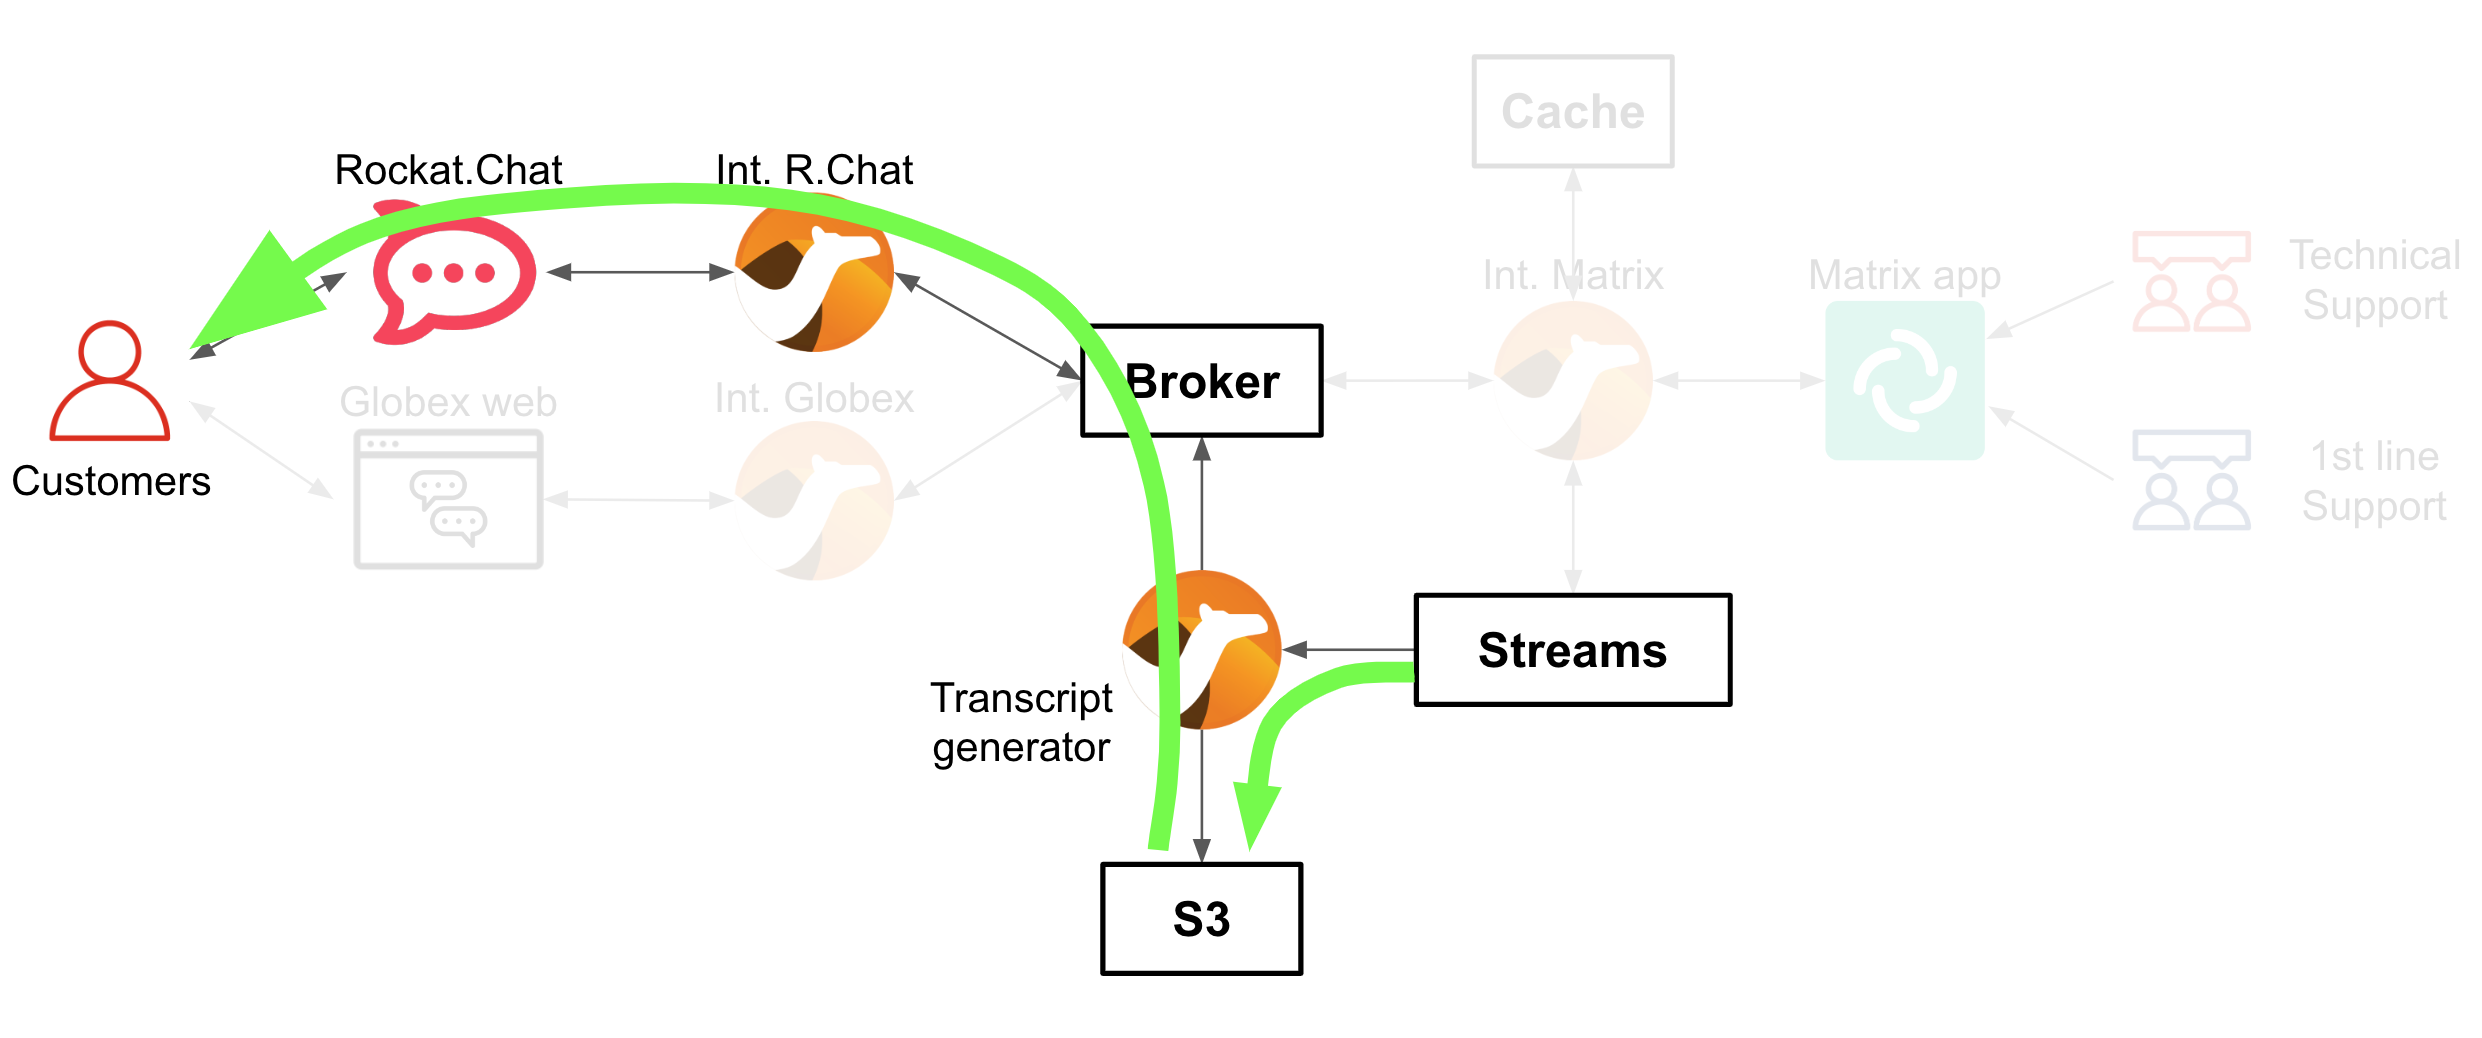
The diagram below illustrates what happens when the customer session ends.
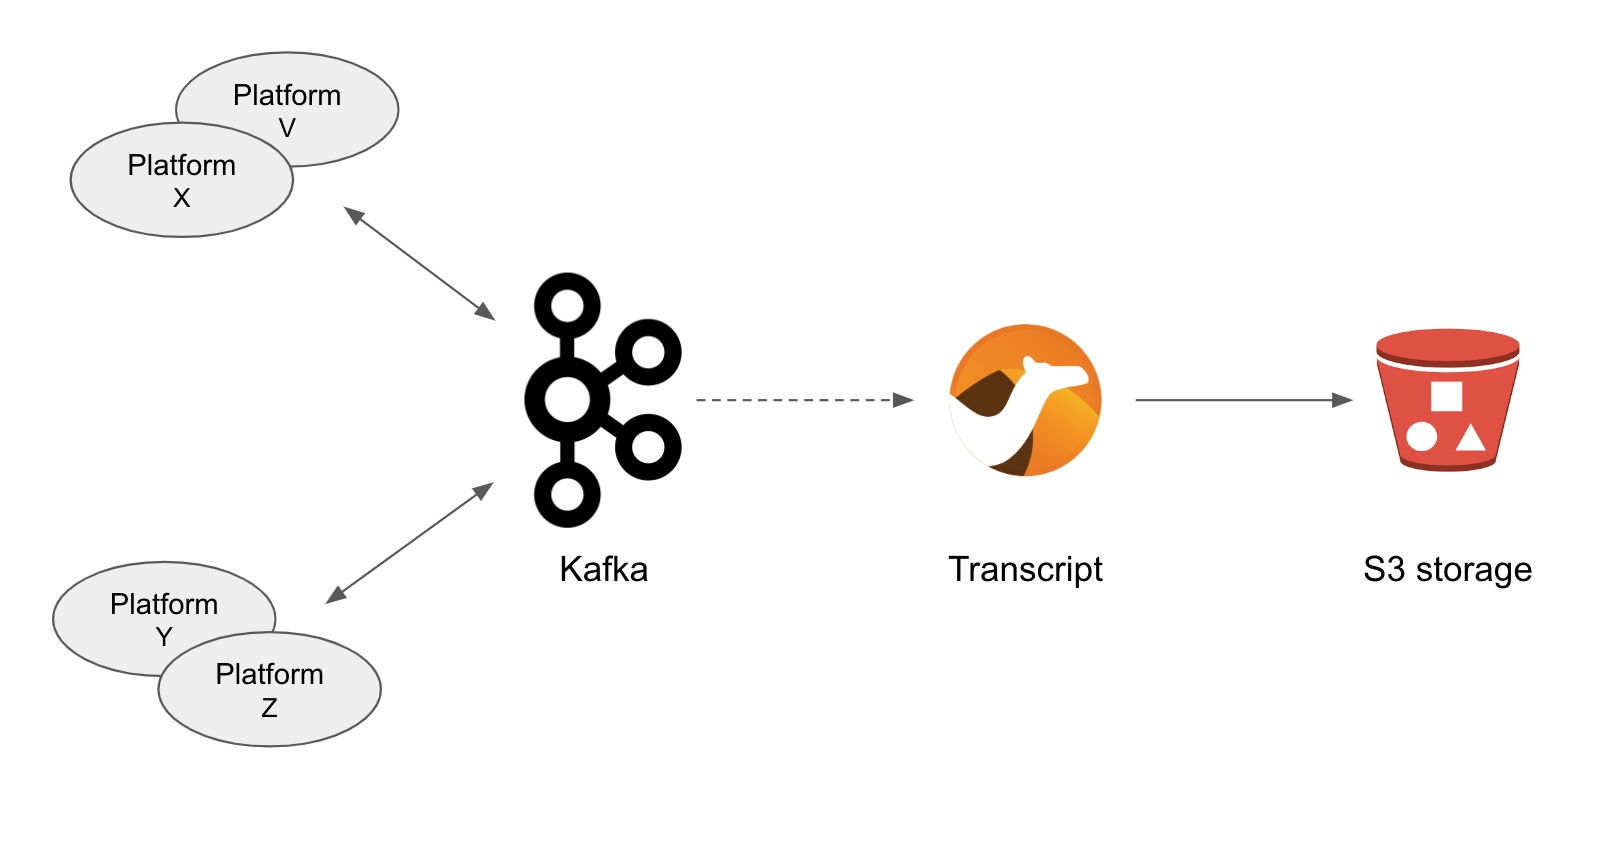
Kafka is used to replay customer/agent messages. The figure above shows traffic directed to kafka and consumed, processed and persisted by Camel.
Let’s now see the functionality in action by ending the customer support session.
From the Matrix system, pretend you’re the technical agent and send the following message to the customer:
-
Agent (technical team):
Anything else I can do for you?
As the customer, you could follow with:
-
Customer:
No, thanks for your assistance.
And then for politeness, the agent could respond:
-
Agent (technical team):
You’re welcome, I will close now the conversation.
Once this formal chit-chat out of the way, from Matrix follow the actions below to close the room:
-
In the left panel, right click the room
-
Click
Leave
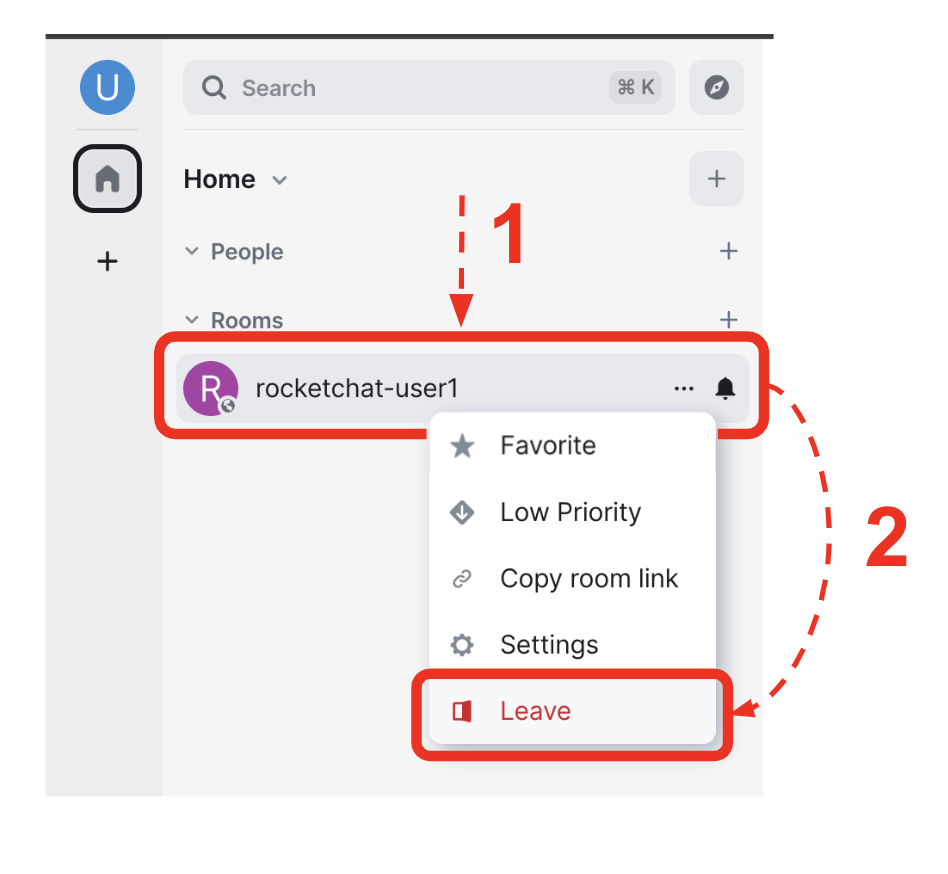
When prompted, click Leave in the confirmation window.
Not only the actions above close the conversation in Matrix, but also, in the background, it triggers the process to generate and archive the transcript.
In a matter of seconds, the customer receives a message in Rochet.chat with a link to the transcript.
Click the PDF transcript to open it in your browser, as illustrated below.
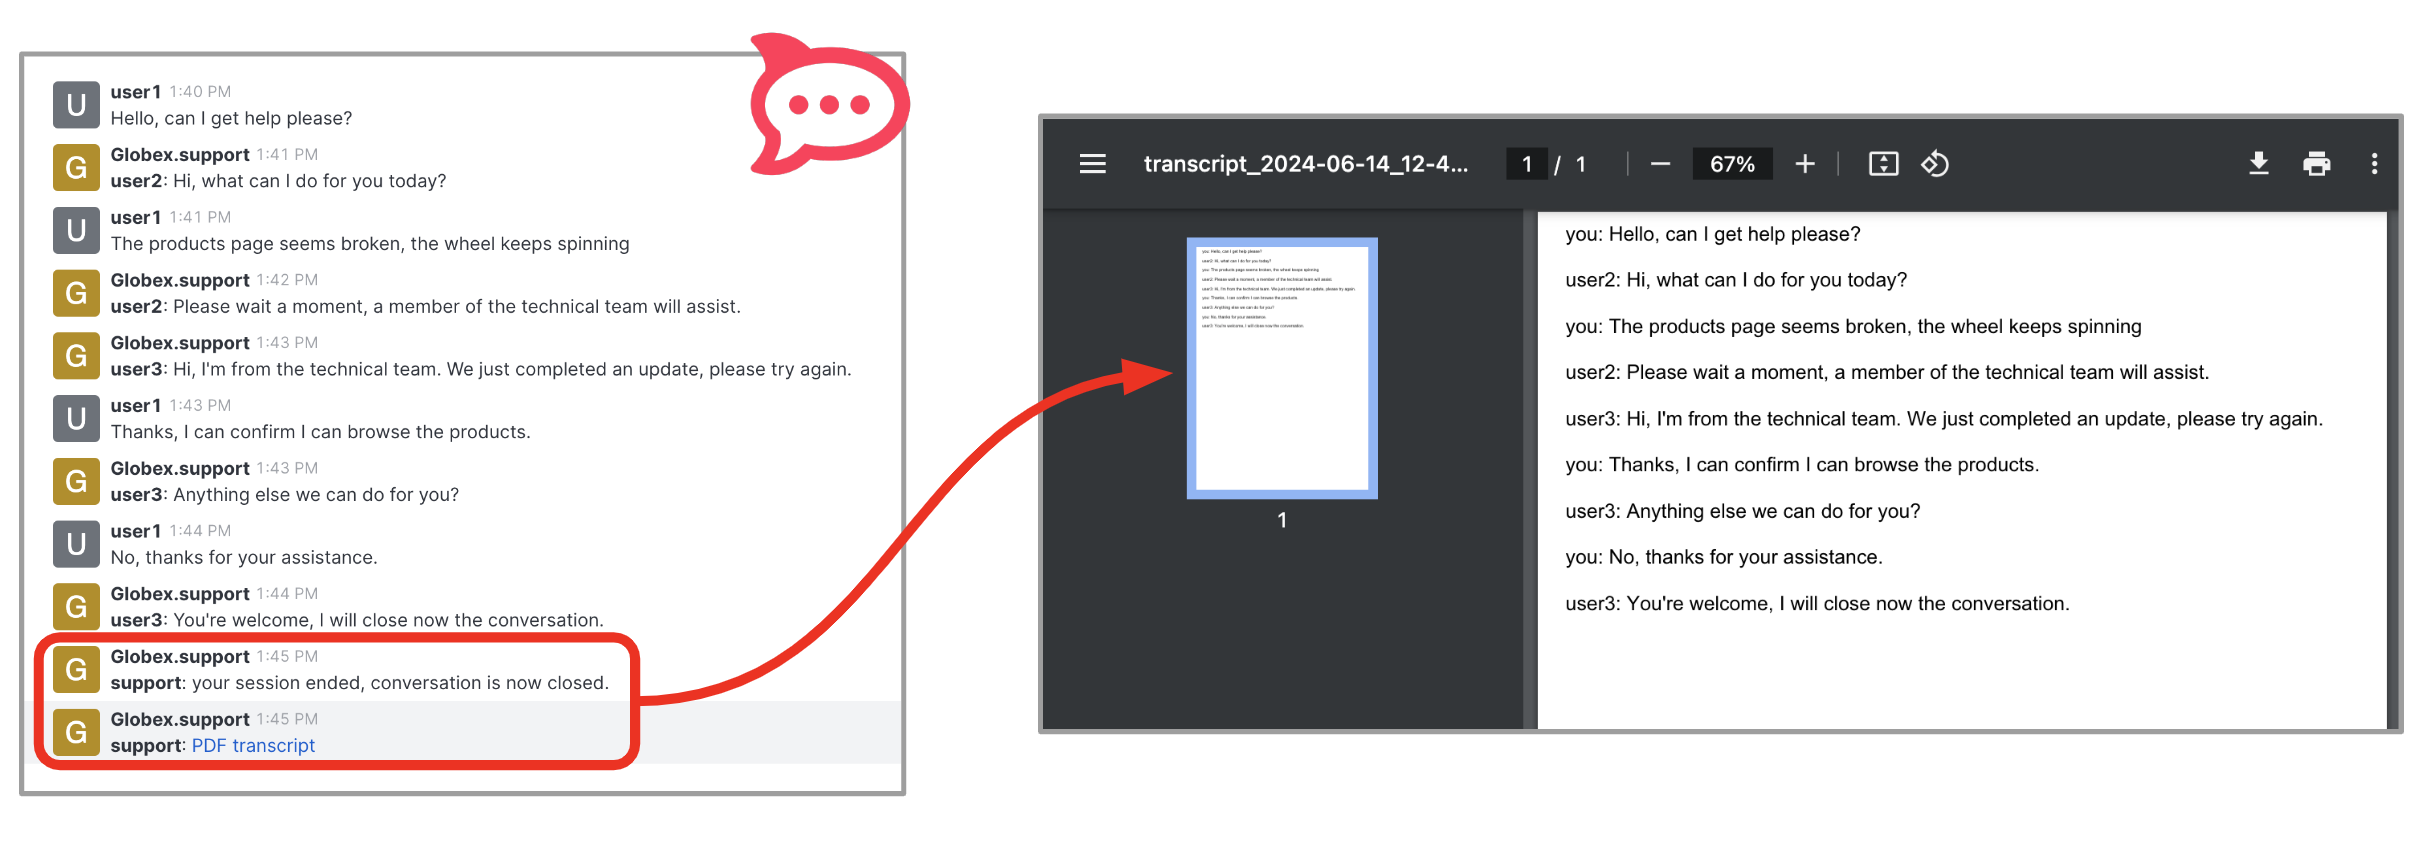
What the process did when the conversation was closed was the following sequence of actions:
-
Replay the full stream of messages stored in Kafka
-
Aggregate the messages
-
Format the content in PDF
-
Push the PDF file to S3 storage
-
Obtain a shareable URL of resource in S3
-
Send a message to Rocket.chat to share the URL
The diagram below describes the processes involved:
4.5. Get support from the Web Portal channel
Up until now, all your customer interactions have been done from Rocket.Chat, but this is a multi-channel platform.
Let’s try out the support service from the Globex Web Portal.
Open your OpenShift console with your given admin credentials and follow the instructions below:
-
Make sure you display the Topologoy view (left menu)
-
Find and select the project
globex-integrations
You should see a number of deployments in your screen. Find among them the Globex Web application and follow the actions below described:
-
Click the route link from the
globex-webdeployment. -
In the web page, find the
Loginoption in the top bar and click it -
You will be proxied to the Single-Sign-On window.
Enter the following credentials:
-
username:
asilva -
Password:
openshift
-
-
Click the Chat blue icon
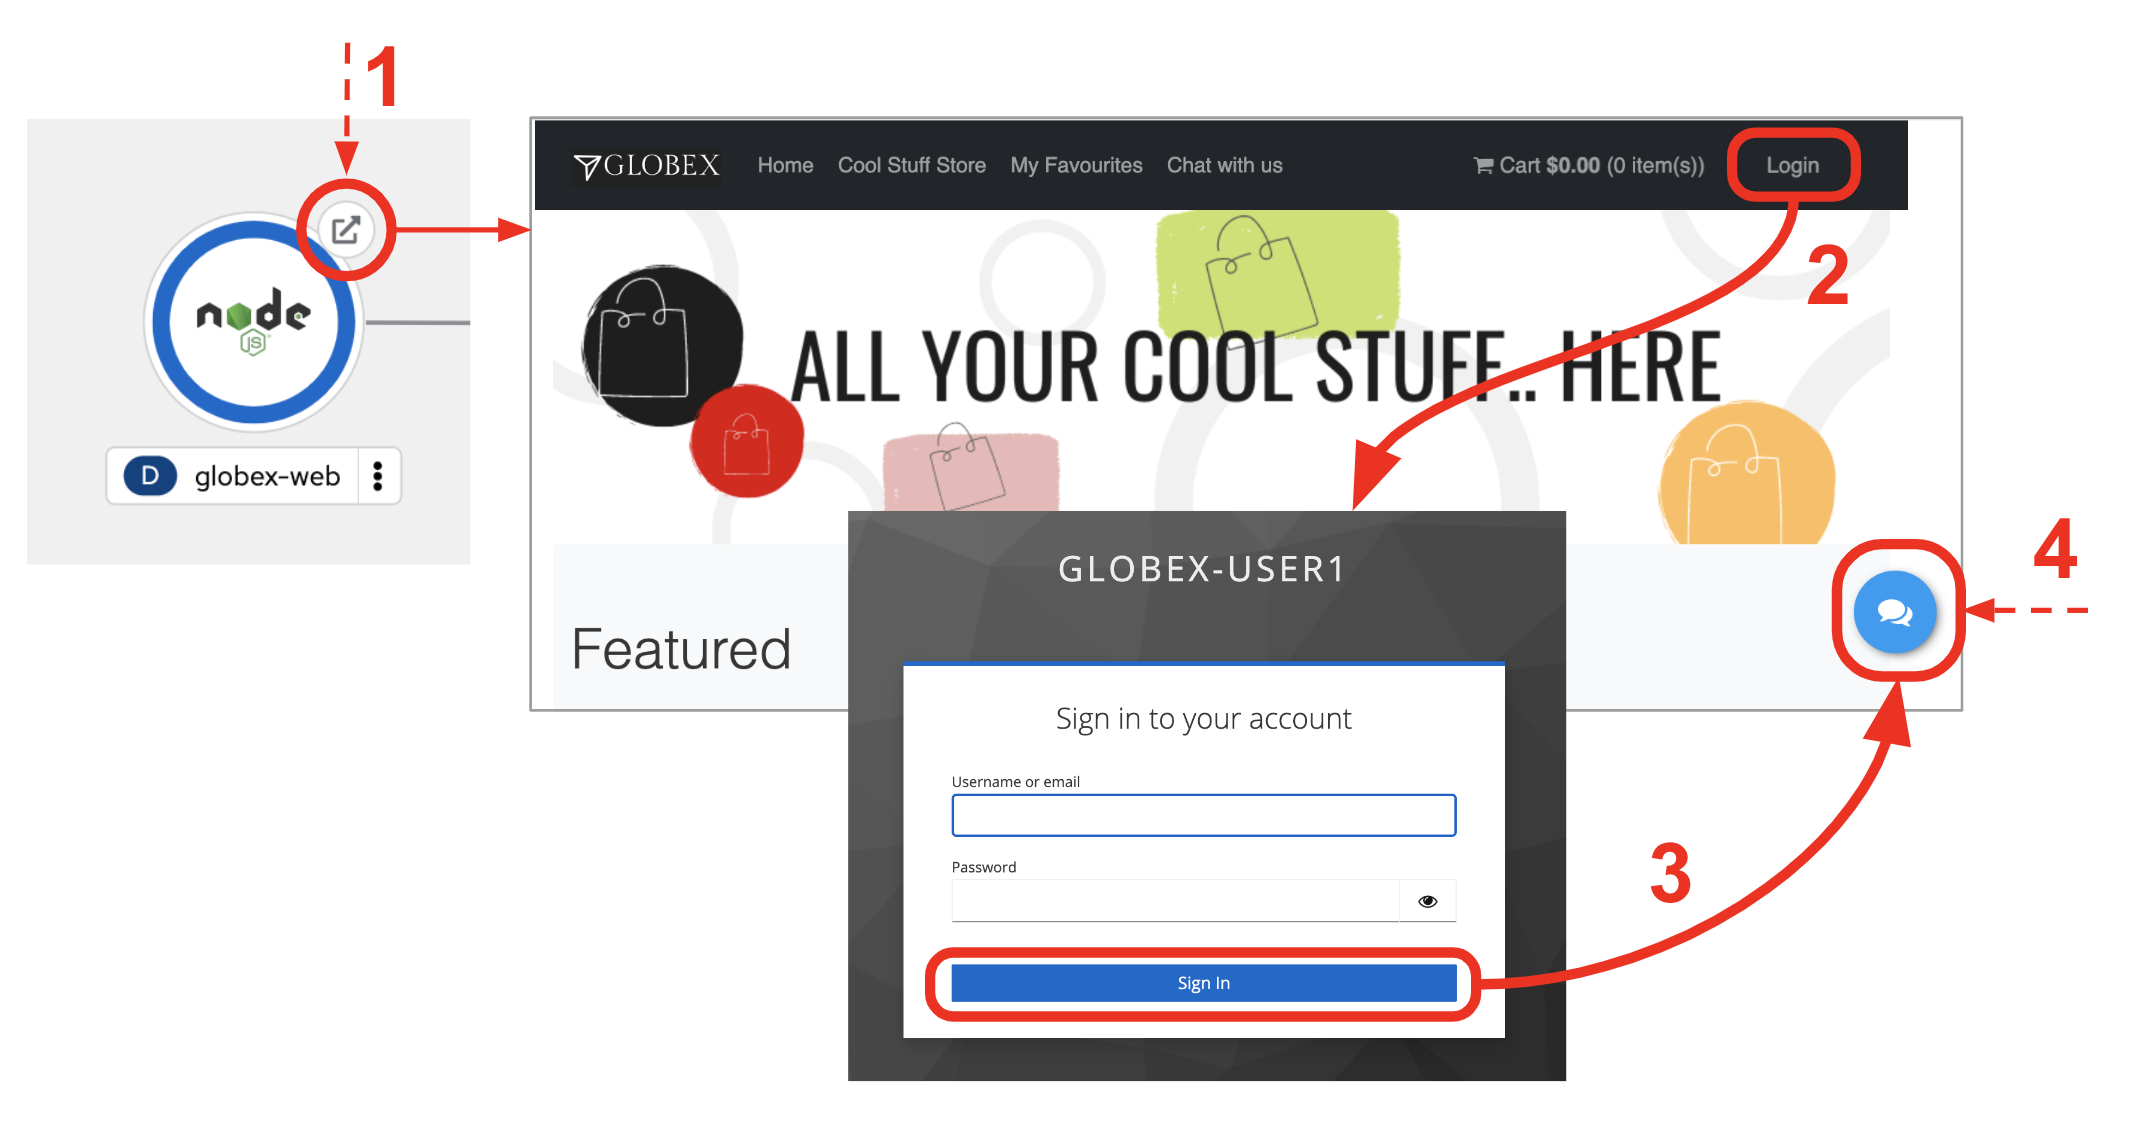
After completing the above steps (as illustrated), you should be presented with the Globex Web Chat interface where you can type in messages to the support team.
In the Chat window, exchange a few messages with the support team, and end the conversation as previously done with the Rocket.chat example.
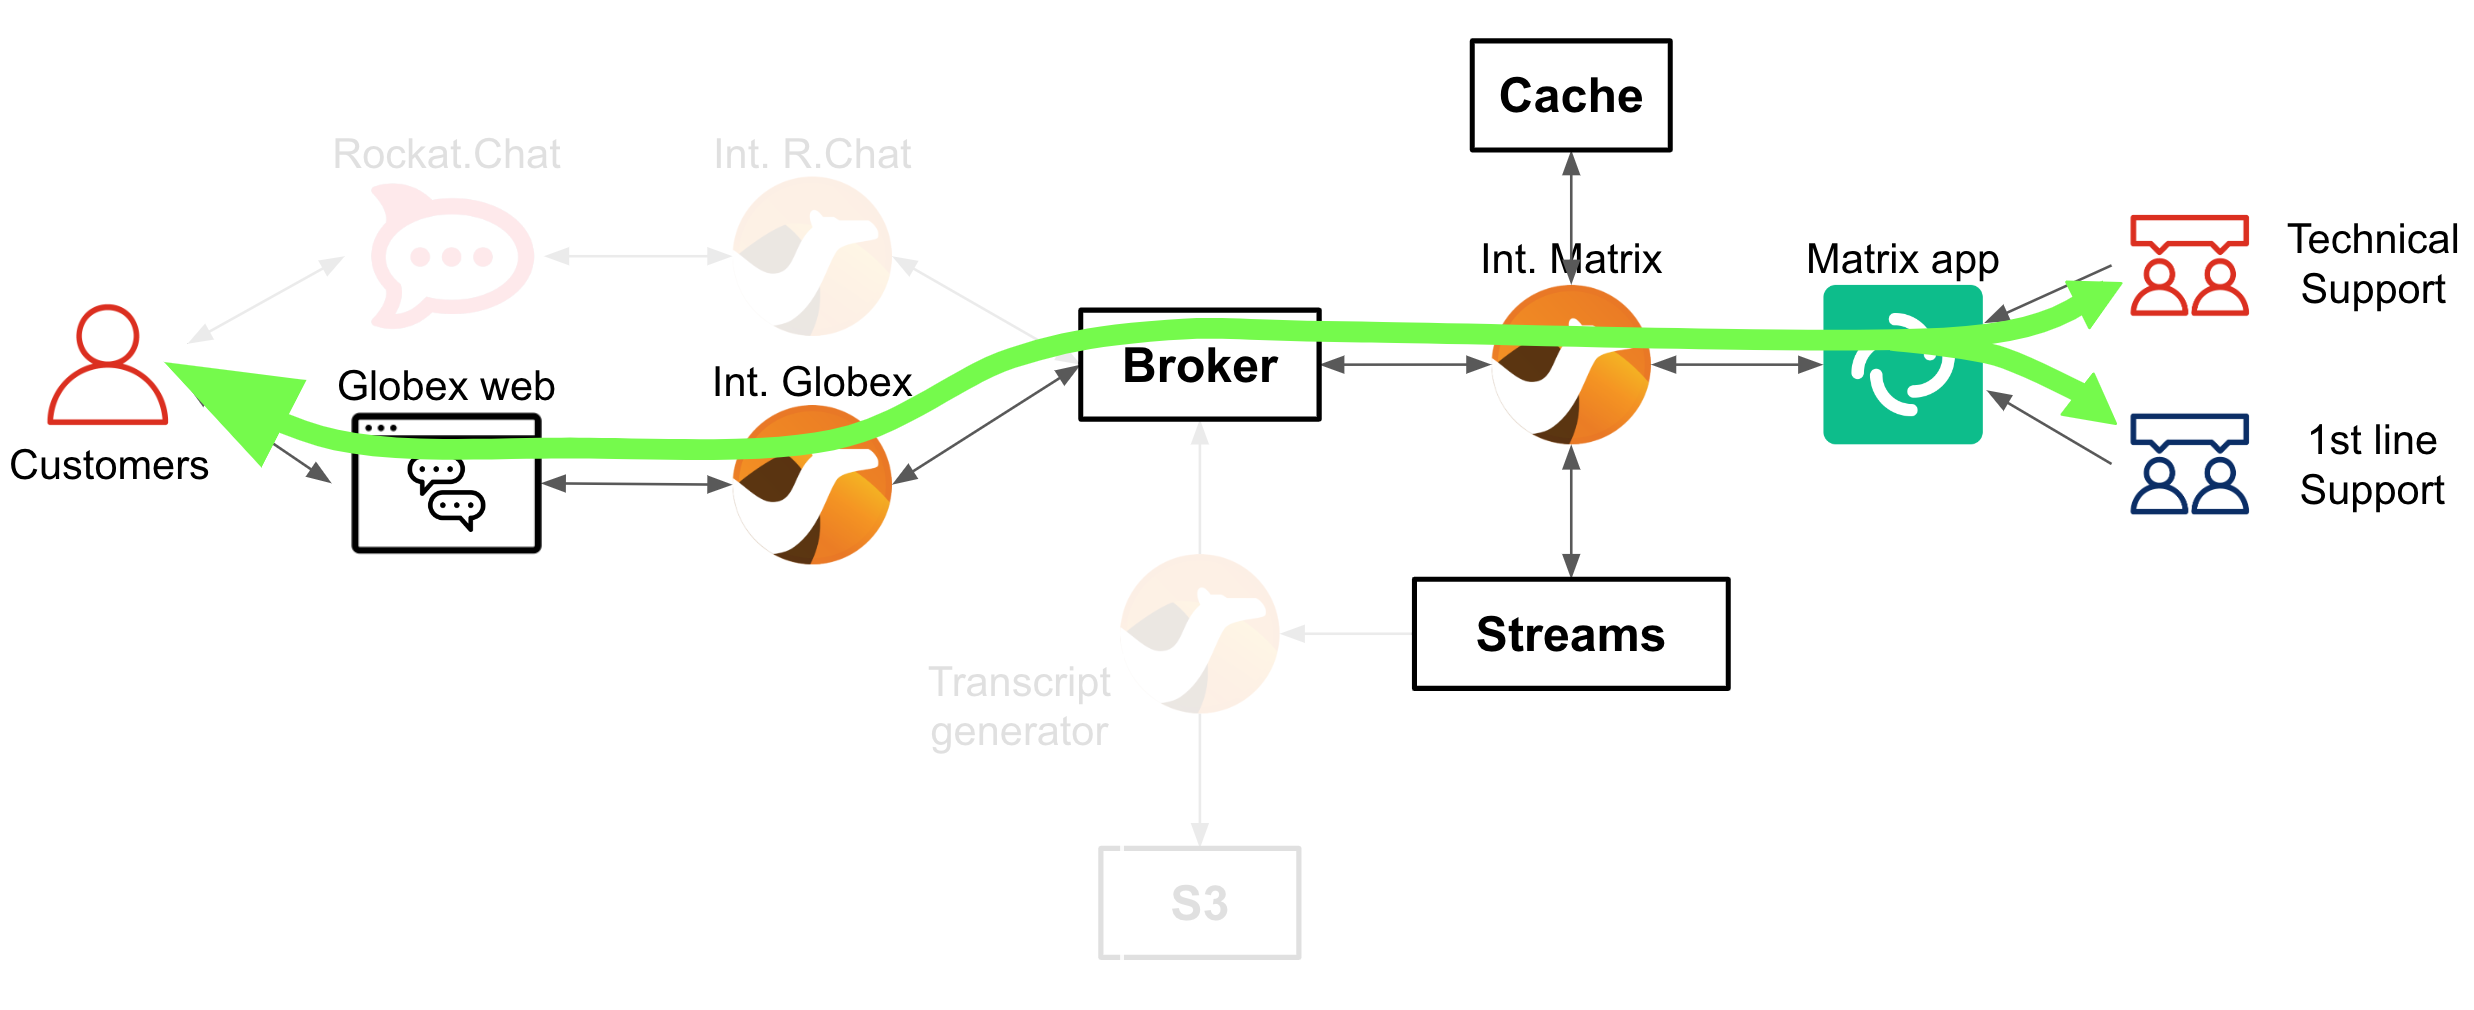
The diagram below shows how data flows via the Globex Web integration.
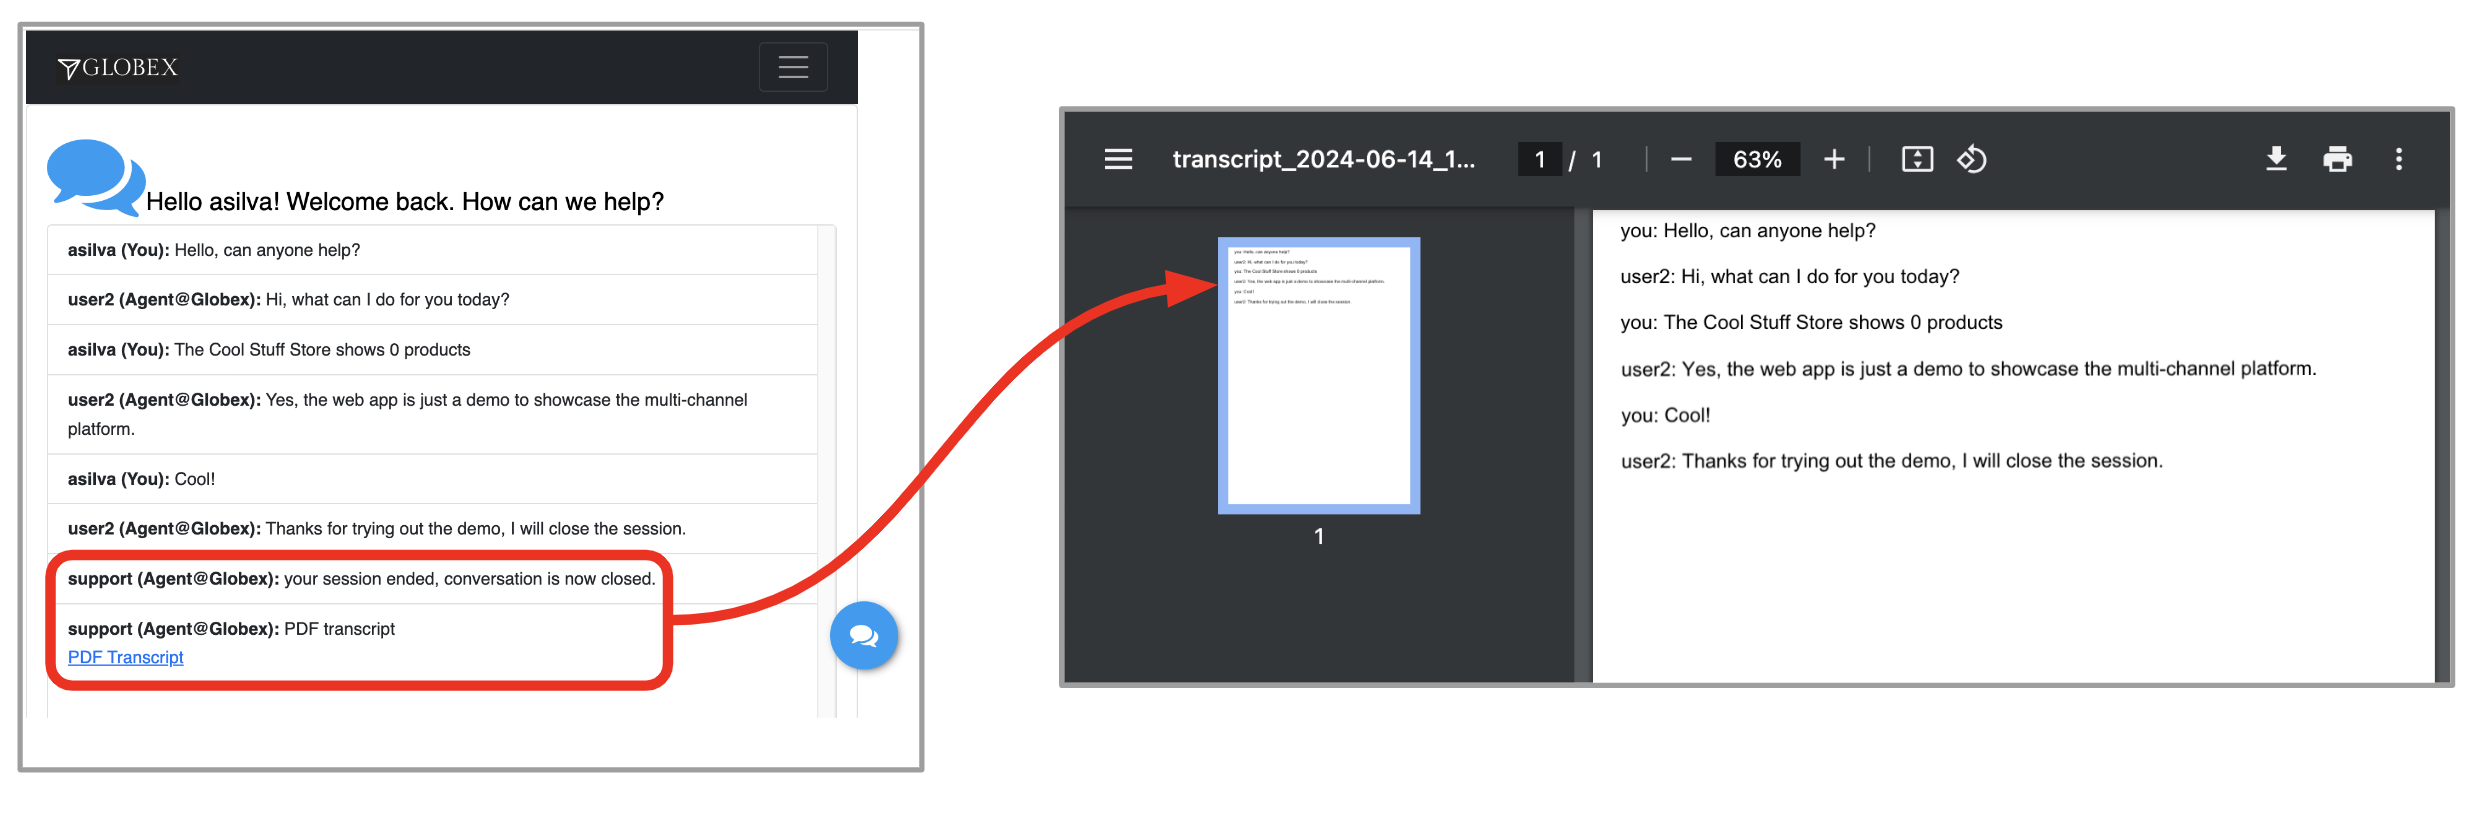
Below you have a sample conversation and the transcript produced out of it.
4.6. Integrate a new 3rd party system
You’ve used so far two customer chat systems currently plugged to the platform (Rocket.chat and Globex Web Chat).
This section demonstrates the extensibility design of the platform to connect a new communication channel. All there is to do is to create an integration that produces/consumes messages to/from AMQ and complies with the data schemas.
Let’s continue by:
-
Explaining the basics of both request/response flows
-
Deploying and testing the new partner integration.
4.6.1. Overview of request/response flows
Request flow
Let’s start with the request flow, where the new system pushes messages from customers to the messaging broker.
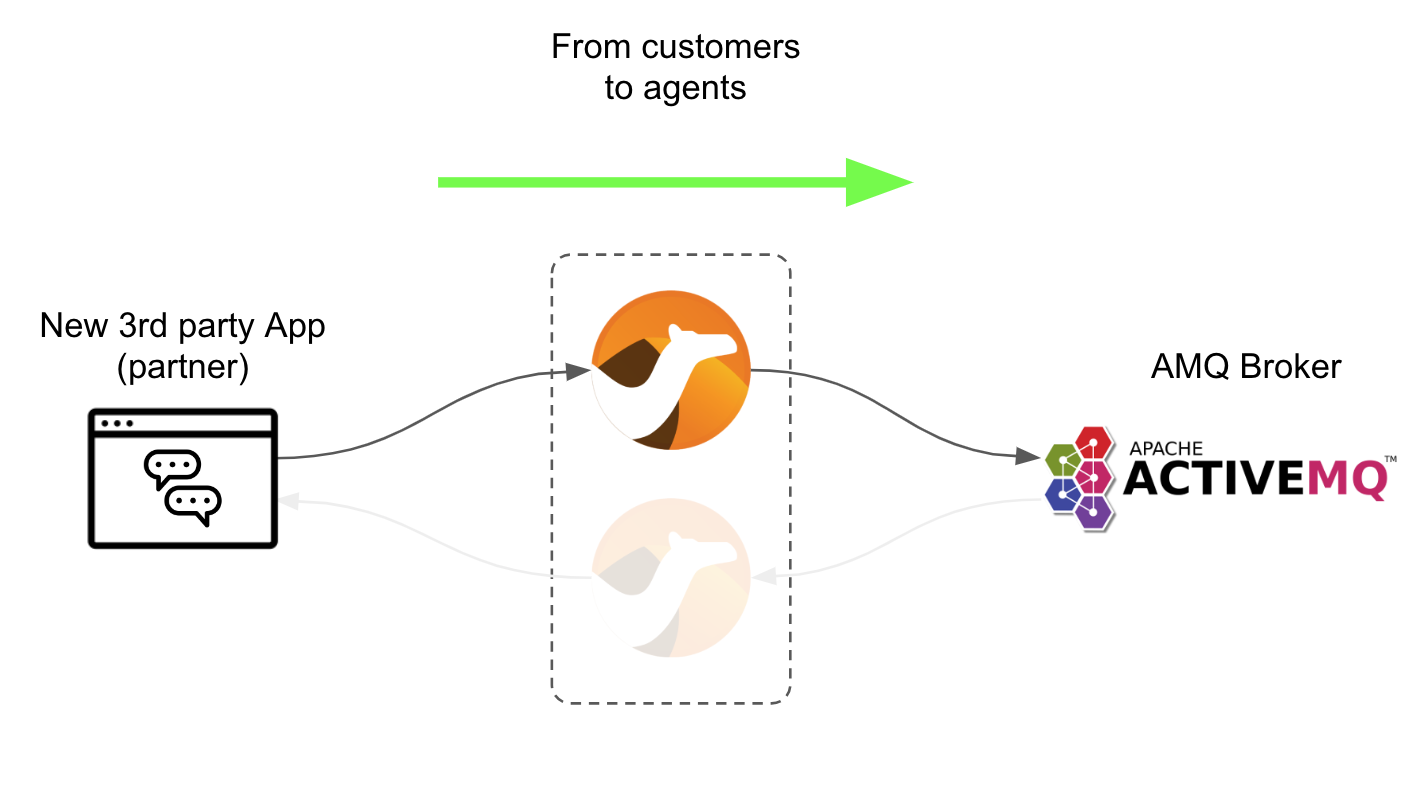
You could use any integration framework you’d like. We use Apache Camel for its versatility, ease of use and proven track record.
The key Camel route to enable the above data flow is shown in this snippet:
from("platform-http:/support/message")
  .convertBodyTo(String.class)
  .to("jslt:request.jslt?allowContextMapAll=true")
  .to("amqp:topic:{{broker.amqp.topic.clients}}?disableReplyTo=true&connectionFactory=#myFactory");
The route above is self-describing.
-
It exposes an HTTP entrypoint.
-
Converts the body to a String (from Byte Stream).
-
Executes a JSON transformation (to comply with the data format).
-
Pushes an AMQP message to the broker.
The JSON transformation maps input fields to output fields and follows the following rules:
{
  "user": .user,
  "text": .text,
  "source": {
    "name" : "partner",
    "uname": "partner",
    "room" : .sessionid
  }
}
In the transformation above, we’re mapping key fields, and we’re indicating the source of the message comes from partner.
The sessionid is the correlator value for the entire conversation.
Response flow
The response flow consumes messages from the AMQ Broker, sent by the support agents and are directed to the system to be integrated.
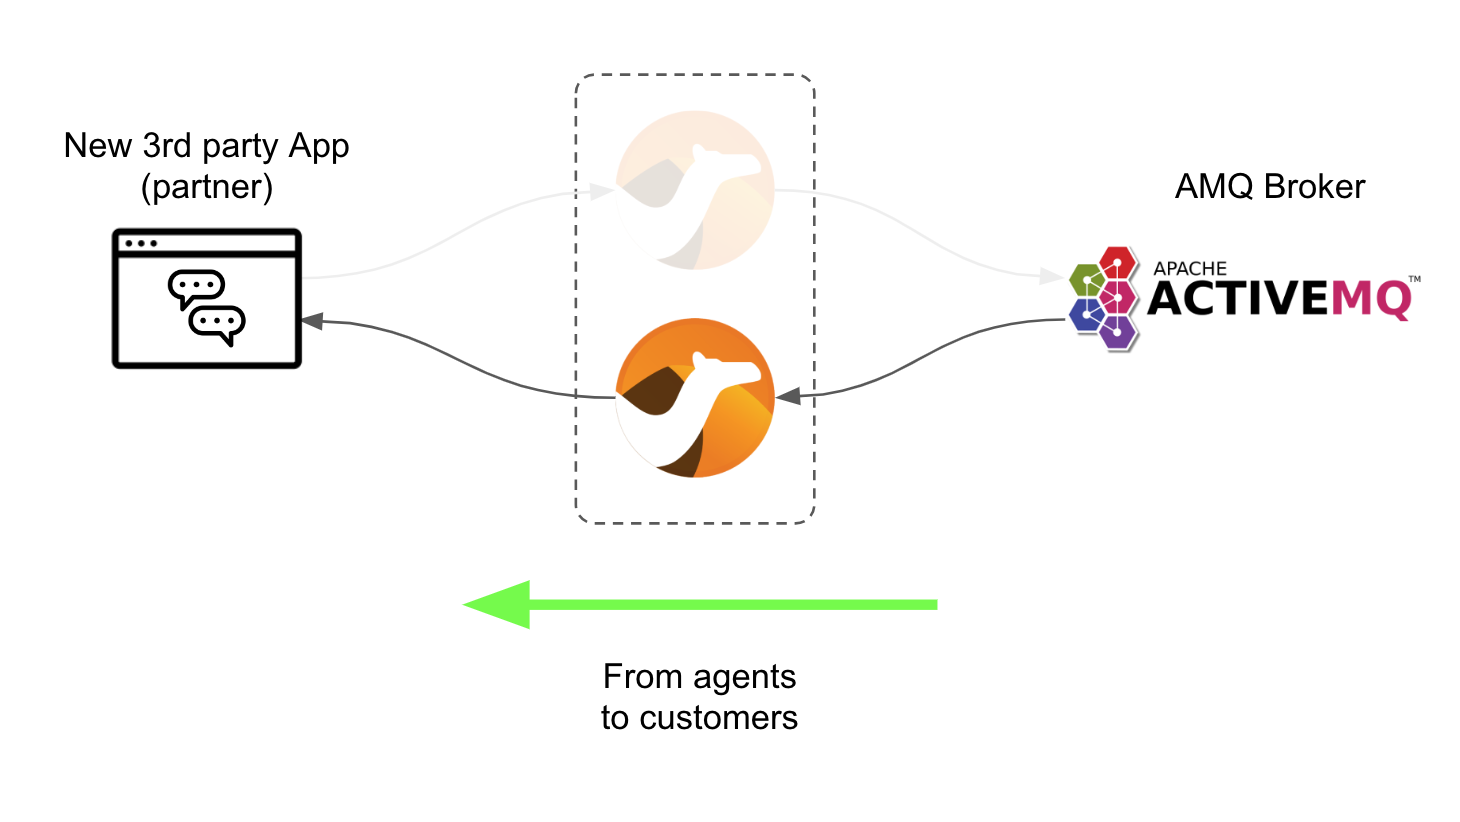
The key Camel route to enable the above data flow is shown in this snippet:
from("amqp:topic:{{broker.amqp.topic.agents}}?connectionFactory=#myFactory")
    .convertBodyTo(String.class)
    .to("jslt:response.jslt?allowContextMapAll=true")
    .to("{{client.callback.url}}");
Again, a very simple route definition where:
-
The consumer obtains messages from a queue in the broker.
-
Converts the body to a String (from Byte Stream).
-
Executes a JSON transformation (to comply with the data format).
-
Sends the data to the new system’s callback URL.
The JSLT transformation would look like:
{
  "agent": .agent,
  "text": .text,
  "sessionid" : .source.room,
  "pdf":  .pdf
}
You can see how the sessionid carries the conversation correlation value, to ensure it’s not mixed with other customer conversations.
That’s essentially all the code you need to integrate a new system. As usual you would add to that the configuration values in a properties file, and the credentials to connect to the broker, but those are technical details.
4.6.2. Deploy and test the new Partner system
It’s time to try it out.
From the top of your OpenShift’s console, click the ⨁ button to import YAML code, as shown below:
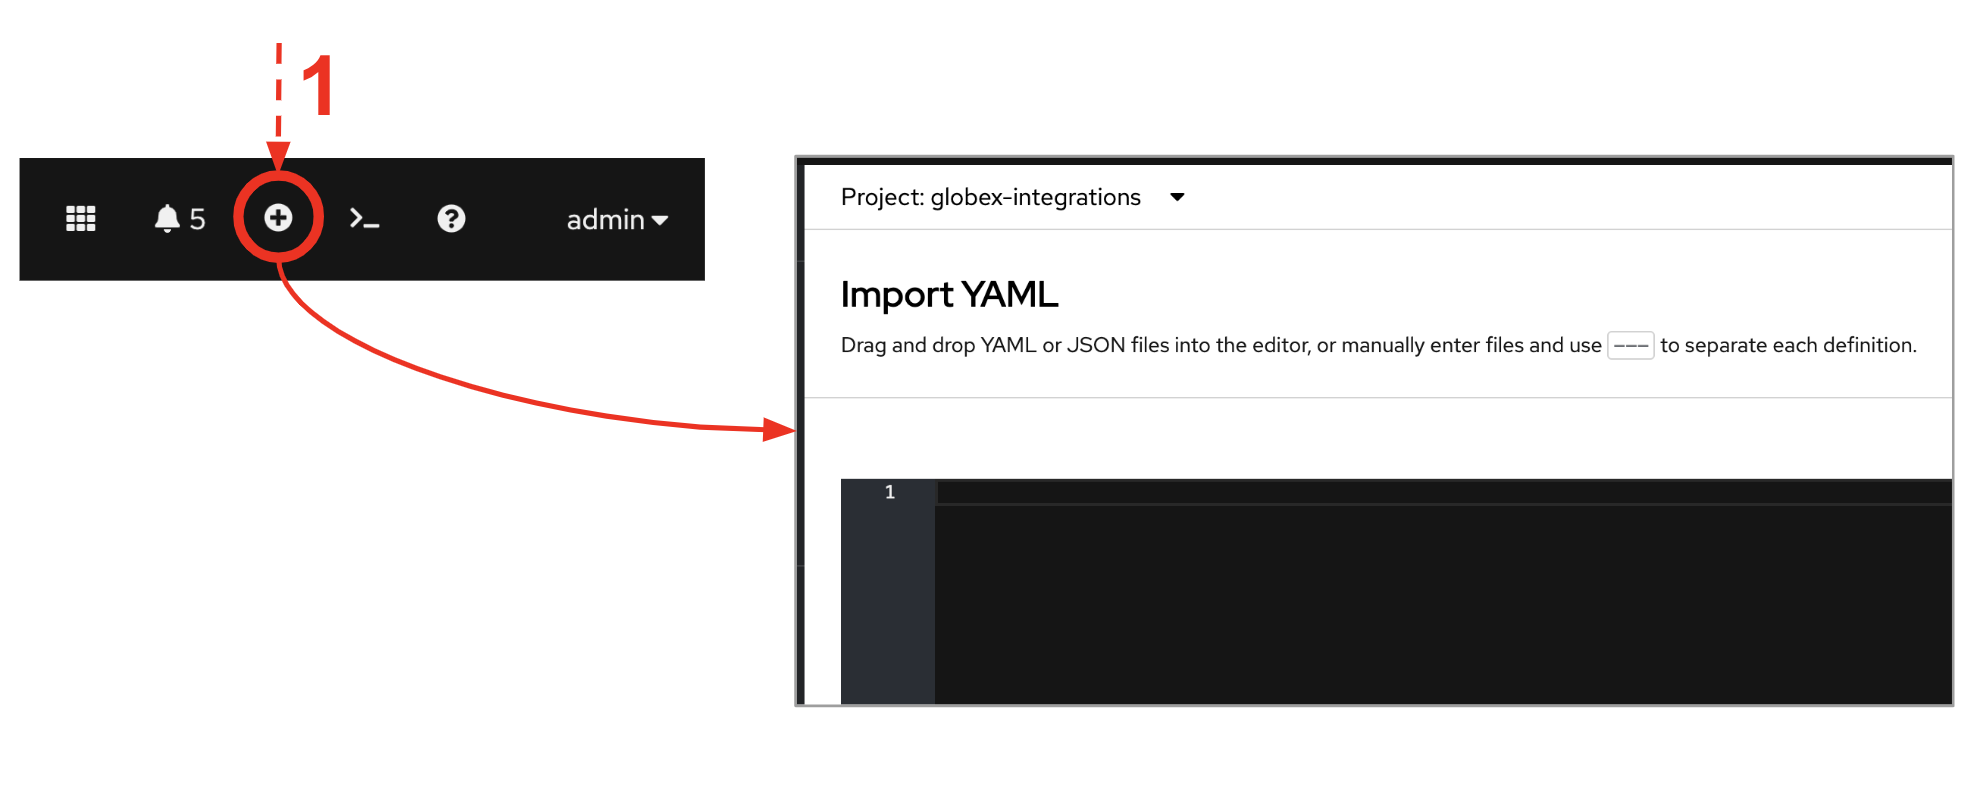
Next, copy the YAML definitions below, and paste them into the YAML editor:
| The source code below contains the snippets viewed earlier. They are deployed as Camel K definitions, automatically processed by the Camel K operator. |
---
kind: ConfigMap
apiVersion: v1
metadata:
  name: partner-support-request-jslt
  namespace: globex-integrations
data:
  request.jslt: |-
    {
        "user": .user,
        "text": .text,
        "source": {
          "name" : "partner",
          "uname": "partner",
          "room" : .sessionid
        }
    }
---
apiVersion: camel.apache.org/v1
kind: Integration
metadata:
  name: partner-support
  namespace: globex-integrations
spec:
  dependencies:
    - 'camel:amqp'
    - 'camel:jackson'
    - 'camel:jslt'
    - 'camel:http'
    - 'mvn:io.quarkiverse.messaginghub:quarkus-pooled-jms:1.1.0'
  sources:
    - name: RoutesPartner.java
      content: |
        // camel-k: language=java

        import org.apache.camel.builder.RouteBuilder;

        public class RoutesPartner extends RouteBuilder {

            @Override
            public void configure() throws Exception {

                from("platform-http:/support/message")
                    .convertBodyTo(String.class)
                    .to("jslt:request.jslt?allowContextMapAll=true")
                    .to("amqp:topic:{{broker.amqp.topic.clients}}?disableReplyTo=true&connectionFactory=#myFactory");

                from("amqp:topic:{{broker.amqp.topic.agents}}?connectionFactory=#myFactory")
                    .convertBodyTo(String.class)
                    .to("jslt:response.jslt?allowContextMapAll=true")
                    .to("{{client.callback.url}}");
          }
        }
    - name: CamelJmsConnectionFactory.java
      content: |
        // camel-k: language=java

        import javax.jms.ConnectionFactory;
        import org.apache.camel.PropertyInject;
        import org.apache.camel.builder.RouteBuilder;
        import org.apache.qpid.jms.JmsConnectionFactory;
        import org.messaginghub.pooled.jms.JmsPoolConnectionFactory;
        import org.slf4j.Logger;
        import org.slf4j.LoggerFactory;

        public class CamelJmsConnectionFactory extends RouteBuilder {

            private static final Logger LOGGER = LoggerFactory.getLogger(CamelJmsConnectionFactory.class);

            @PropertyInject("broker.amqp.uri")
            private static String uri;

            @PropertyInject("broker.amqp.connections")
            private static int maxConnections;

            @Override
            public void configure() {
                JmsPoolConnectionFactory myFactory = createConnectionFactory();
                getContext().getRegistry().bind("myFactory", myFactory);
            }

            private JmsPoolConnectionFactory createConnectionFactory() {

                ConnectionFactory factory = new JmsConnectionFactory(uri);
                JmsPoolConnectionFactory pool = new JmsPoolConnectionFactory();

                try {
                    pool.setConnectionFactory(factory);

                    // Set the max connections per user to a higher value
                    pool.setMaxConnections(maxConnections);

                } catch (Exception e) {
                    LOGGER.error("Exception creating JMS Connection Factory", e);
                }

                return pool;
            }
        }
  traits:
    camel:
      properties:
        - 'client.callback.url = http://partner-callback:80/partner/callback'
        - broker.amqp.connections = 5
        - broker.amqp.topic.clients = support.globex.client.partner
        - broker.amqp.topic.agents = support.partner
    mount:
      configs:
        - 'secret:client-amq'
      resources:
        - 'configmap:partner-support-request-jslt/request.jslt@/etc/camel/resources/request.jslt'
        - 'configmap:globex-support-response-jslt/response.jslt@/etc/camel/resources/response.jslt'
Click Create.
| Be patient, Camel K will process the integration YAML. It shouldn’t take too long, between 1-2 minutes. |
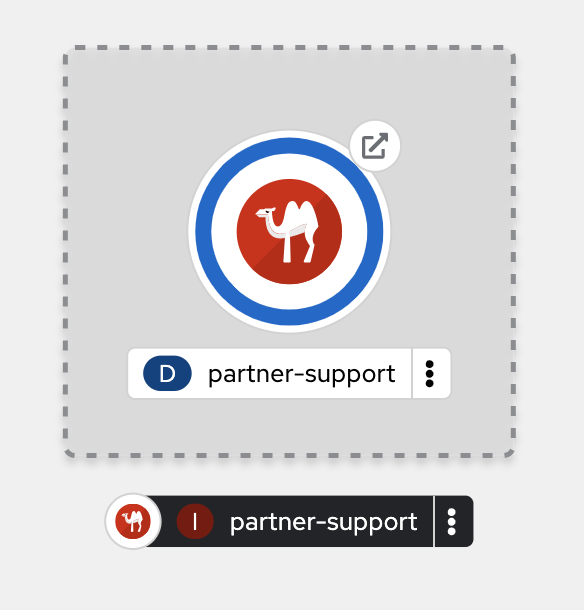
After some time you’ll see the integration partner-support deployed and running:
Test the request flow
To simulate the client interface, using a curl command, we will invoke the integration HTTP endpoint to send a message from a fictitious customer.
The OpenShift console comes with a terminal you can use. Follow the steps below to open the terminal.
-
From the top of your OpenShift’s console, click the
>_button to open the terminal window:

Now, use the curl command below to send an HTTP request against the integration point to simulate the client interaction:
curl \
-H "content-type: json" \
-d '{"user":"client1", "text":"Asking for help from the command line", "sessionid":"0001"}' \
http://partner-support.globex-integrations.svc:80/support/message
Press Enter.
You should see in Matrix a new room created. Agents can now attend the client’s request as usual.
Test the response flow
When agents respond back, the new Partner integration consumes events from AMQ Broker and invokes the Partner callback URL.
The strategy to send asynchronous responses to the Partner interface is via HTTP callbacks.
We need to put in place an HTTP process that will listen for callbacks. The Camel integration has already been pre-defined to send callbacks to the following address:
http://partner-callback:80/partner/callbackOnce again, you can choose the language of your liking to deploy a process ready to listen for HTTP callbacks.
We will use Camel K once more since it’s so handy and simple.
From the top of your OpenShift’s console, click the ⨁ button to import YAML code, as shown below:

Next, copy the YAML definition below, and paste it into the YAML editor:
| The source code below contains the snippets viewed earlier. They are deployed as Camel K definitions, automatically processed by the Camel K operator. |
apiVersion: camel.apache.org/v1
kind: Integration
metadata:
  name: partner-callback
  namespace: globex-integrations
spec:
  flows:
    - from:
        uri: 'platform-http:/partner/callback'
        steps:
          - convertBodyTo:
              type: String
          - to: 'log:info'
Click Create.
The Camel route above basically listens for HTTP requests, and prints out their body. The process prints the payload and we will be able to see the responses agents send from Matrix.
| Be patient, Camel K will process the integration YAML. It shouldn’t take too long, between 1-2 minutes. |
After some time you’ll see the partner-callback system deployed and running.
Open the system logs. Follow the actions below:
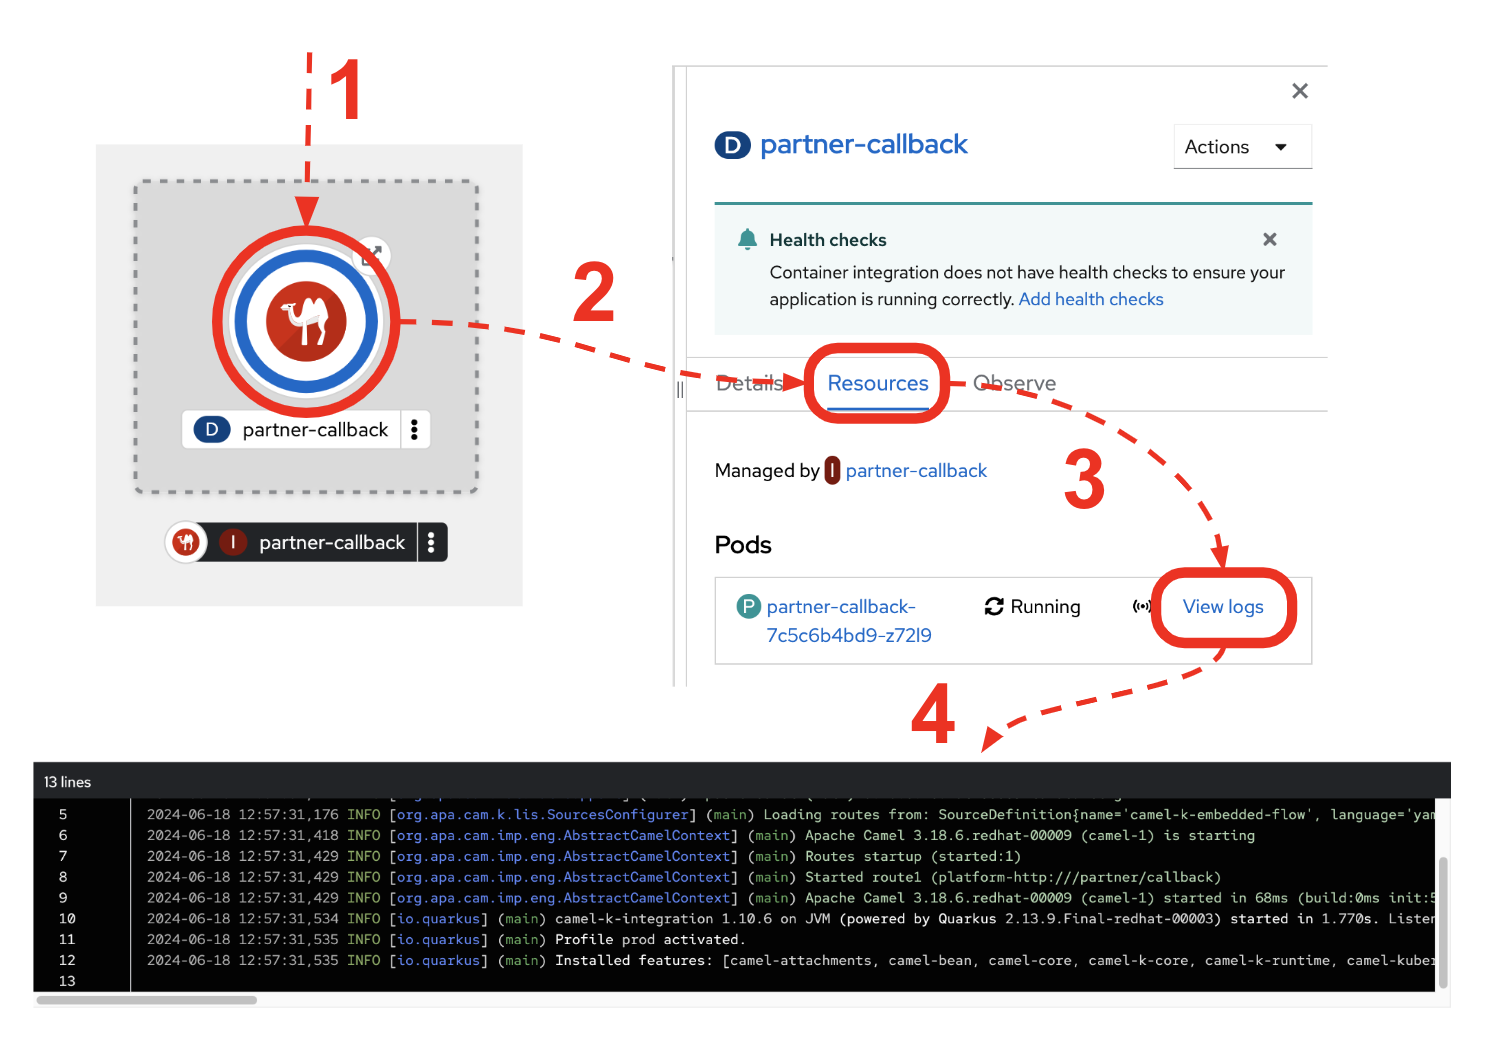
Test your callback URL by issuing the following curl command:
curl \
-H "content-type: text" \
-d "test callback" \
http://partner-callback.globex-integrations.svc:80/partner/callback
You should see in your logs the following trace:
... Exchange[ExchangePattern: InOut, BodyType: String, Body: test callback]
If you saw the trace, it means your callback system is ready to get agent responses.
Put your support agent hat on, and from Matrix, respond to the client message, for example with:
-
Agent (1st line):
Hello, how can I help a client using a terminal?
You see the response showing in the partner callback logs, with a trace similar to:
... Exchange[ExchangePattern: InOut, BodyType: String, Body: {"agent":"user2","text":"Hello, how can I help a user in the command line?","sessionid":"0001"}]
Well done! You should now be familiar with the hightlights of this Solution Pattern.
